Configure Service Mesh
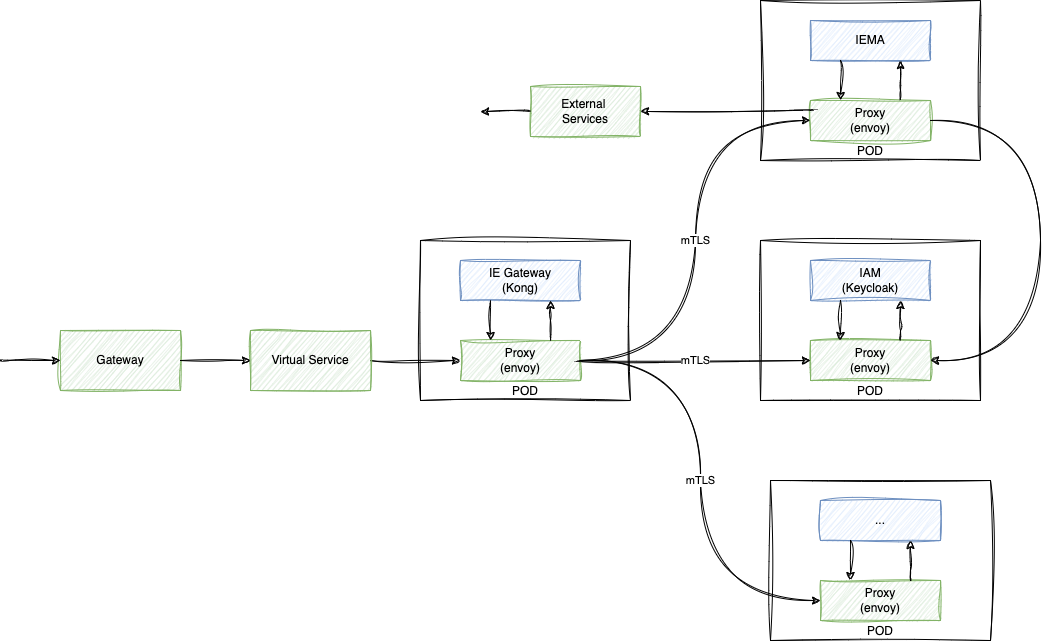
Istio is an open source service mesh designed to extend the capabilities of Kubernetes. It is a dedicated layer that handles service-to-service communication, traffic management and observability in a K8s installation. Istio can secure communication between services using mutual TLS (encryption), additional authentication and authorisation, and access control policies for services.
Installation
Installing Istio with Helm is a convenient way to manage Istio's deployment and configuration on your Kubernetes cluster. For detailed guide, use the official helm documentation.
Prerequisites
- Ensure you have a Kubernetes cluster up and running. Istio supports various Kubernetes distributions like Minikube, GKE, EKS, AKS, etc.
- Helm CLI and Kubernetes CLI are required to install and configure istio.
- IEM Installation in a dedicated namespace.
Install Istio with Helm
If Istio is already installed jump directly to Configure service mesh.
-
Add Istio repository to helm.
helm repo add istio https://istio-release.storage.googleapis.com/charts helm repo update -
Install Istio control plane.
kubectl create namespace istio-system helm install istio-base istio/base -n istio-system helm install istiod istio/istiod -n istio-system --wait -
Install Istio Ingress Gateway to manage ingress traffic.
kubectl create namespace istio-ingress
kubectl label namespace istio-ingress istio-injection=enabled
helm install istio-ingress istio/gateway -n istio-ingress --wait
Install IEM with provisioning CLI
The prerequisit for deploying the IEM is a DNS name or IP address. In this step, a
LoadBalanceris created. If you do not want to use a custom DNS record, you must complete this step before deploying the IEM. Get the DNS with:kubectl get svc -n istio-ingress.
Configure service mesh
-
Deploy TLS certificates for Gateway. Generate certificates following Istio guidelines e.g. with openssl or purchase public trusted certificates. Deploy the certificate as a K8s secret.
kubectl create -n istio-ingress secret tls <secret-name> \ --key=example.com.key \ --cert=example.com.crt -
Deploy Ingress Gateway and Virtual Service. The following exampple applies for AWS. The command creates a classic Elastic Load Balancer (ELB). For different K8s distributions details may change.
kubectl apply -n <namespace> -f - <<EOF
apiVersion: networking.istio.io/v1beta1
kind: Gateway
metadata:
  name: <gateway-name>
  namespace: <namespace>
spec:
  selector:
    istio: ingressgateway
  servers:
  - hosts:
    - '*'
    port:
      name: https
      number: 443
      protocol: HTTPS
    tls:
      credentialName: iemcerts
      mode: SIMPLE
If the Istio Gateway is already in place
For a production cluster with an existing Istio configuration, the Gateway may already exists. If the Istio gateway already exists, it is not necessary to create a new one. This means that the certificate should already exist and be matched to the gateway. This means that the next step would be to create a virtual service (see next step).
-
Deploy Virtual Service to connect Istio Gateway and IE Gateway The Virtual Service uses the Istio API and defines routing rules.
Get the service name of IEM Gateway with the following command:
kubectl get svc --no-headers -o custom-columns=":metadata.name" -n <namespace> | grep gateway-proxy
# Output:
# ieb14c-gateway-proxy
Configure the virtual service, using the iem-gateway name from the previous command.
kubectl apply -n <namespace> -f - <<EOF apiVersion: networking.istio.io/v1beta1 kind: VirtualService metadata: name: <name-of-virtual-service> namespace: <namespace> spec: gateways: - <gateway-name> hosts: - '*' http: - headers: request: set: x-forwarded-port: "443" x-forwarded-proto: https match: - uri: prefix: / route: - destination: host: <iem-gateway-name> port: number: 80 -
Configure the network topology. Due to the variety of network topologies that Istio can be deployed in, set the numTrustedProxies to the number of trusted proxies deployed in front of the Istio gateway proxy, so that the client address can be extracted correctly.
kubectl edit cm istiod -n istio-system # add following keys to the existing configuration data: mesh: |2- defaultConfig: gatewayTopology: # <- add: gatewayTopology: numTrustedProxies: 4 # <- add: numTrustedProxies: 4 -
Deploy destination rule to shape outbound traffic
apiVersion: networking.istio.io/v1beta1 kind: DestinationRule metadata: annotations: name: gateway-ds spec: host: <iem-gateway-name> trafficPolicy: loadBalancer: simple: ROUND_ROBIN tls: mode: DISABLE -
Disable sidecar for cronjob. To disable sidecar injection, edit the cronjob regsecgen and add a label with
key: sidecar.istio.io/inject"andvalue: "false".# Add label to pod spec section kubectl patch cronjob regsecgen -n <namespace> --patch '{"spec": {"jobTemplate": {"spec": {"template": {"metadata": {"labels": {"sidecar.istio.io/inject": "false"}}}}}}}' -
Enable Istio Sidecar automatic injection. Istio can inject automatically sidecars which will enable the mesh feature for services within the namespace.
kubectl label namespace <iem-namespace> istio-injection=enabled --overwrite kubectl delete pods --all -n <iem-namespace> -
Configure Virtual Service for Keycloak.
apiVersion: networking.istio.io/v1beta1 kind: VirtualService metadata: annotations: name: keycloak namespace: <namespace> spec: hosts: - keycloak.<namespace>.svc.cluster.local http: - match: - uri: prefix: / route: - destination: host: keycloak port: number: 8080 -
Configure Virtual Service for gateway-admin. Get the name of the
gateway-adminservice:kubectl get svc --no-headers -o custom-columns=":metadata.name" -n <namespace> | grep gateway-admin # Output: ieb14c-gateway-admin
Insert the service name of the gateway-admin and the namespace in the following file:
```yaml
apiVersion: networking.istio.io/v1beta1
kind: VirtualService
metadata:
  annotations:
  name: keycloak
spec:
  hosts:
  - keycloak.<namespace>.svc.cluster.local
  http:
  - match:
    - uri:
        prefix: /
    route:
    - destination:
        host: keycloak
        port:
          number: 8080
```
NOTICE
For debugging purposes you can enable envoy sitecar logging.
Edit the configmap istio in the namespace istio-system and add accessLogFile: /dev/stdout to the mesh section.