Setting up Industrial Edge Management Virtual
Industrial Edge Management Virtual (IEM Virtual) provides a streamlined installation experience for deploying Industrial Edge Management as a virtual machine on ESXi, Hyper-V, and VMware Workstation hypervisors. It is ideal for customers seeking to host IEM in their own setup and infrastructure. IEM Virtual stores all data on-premises and offers robust service and maintenance features to support reliable business operations.
Prerequisites for IEM Virtual
- You have ordered Industrial Edge Hub Access.
- You have received an email about the IE Hub Access.
- You have outbound internet access for the onboarding process and IEM to IE Hub communication. Refer to the IP protocols, ports, and services and domain names for more information.
-
You have a hypervisor software: ESXi, Hyper-V, or VMware Workstation Player / VMware Workstation Pro.
-
Hyper-V
- You have a Tool to extract
.xz(Linuxxz/tar, or Windows tools such as 7‑Zip) -
You have administrative rights on the Hyper-V host.
NOTICE
Follow official Microsoft instructions: Enable Hyper-V on Windows
Optional quick PowerShell example for Windows Server / Pro editions:
Enable-WindowsOptionalFeature -Online -FeatureName Microsoft-Hyper-V -All -NoRestartReboot the host if Hyper-V was newly enabled. * VMware Workstation Player or VMware Workstation Pro.
- You have an existing network setup.
- IP plan ready, either static or static through DHCP.
- You have an existing network setup.
NOTICE
For productive use, use a fully qualified domain name (FQDN) that is resolvable by a DNS server. A static IP address should only be used for testing or development.
NOTICE
Ensure the IP address does not change over the lifetime of the IEM. If the IP address changes, the IEM may stop functioning. If you use DHCP, configure an IP reservation or a static lease so the assigned IP does not change.
- You have a Tool to extract
-
External virtual switch configured (recommended). Internal switch only for advanced routing / NAT setups.
Creating a NAT switch on Hyper-V Manager
For official guidance, consult the Microsoft Hyper-V documentation on virtual switches and NAT configuration.
-
-
Minimum free disk space: size of extracted
.vhdxplus growth buffer. - Hardware requirements for IEM Virtual allocation.
Creating the virtual machine
This section illustrates creating a virtual machine using VMware Workstation, ESXi or the Hyper-V hypervisor.
Conditional steps
Downloading and creating the virtual machine
- Open Industrial Edge Hub.
- Click "Download software" from the left navigation pane. The "Download software" page opens.
-
Click "Download" on the tile named "Industrial Edge Management Virtual - Microsoft Hyper-V". Save the file locally. The
.vhdxfile downloads.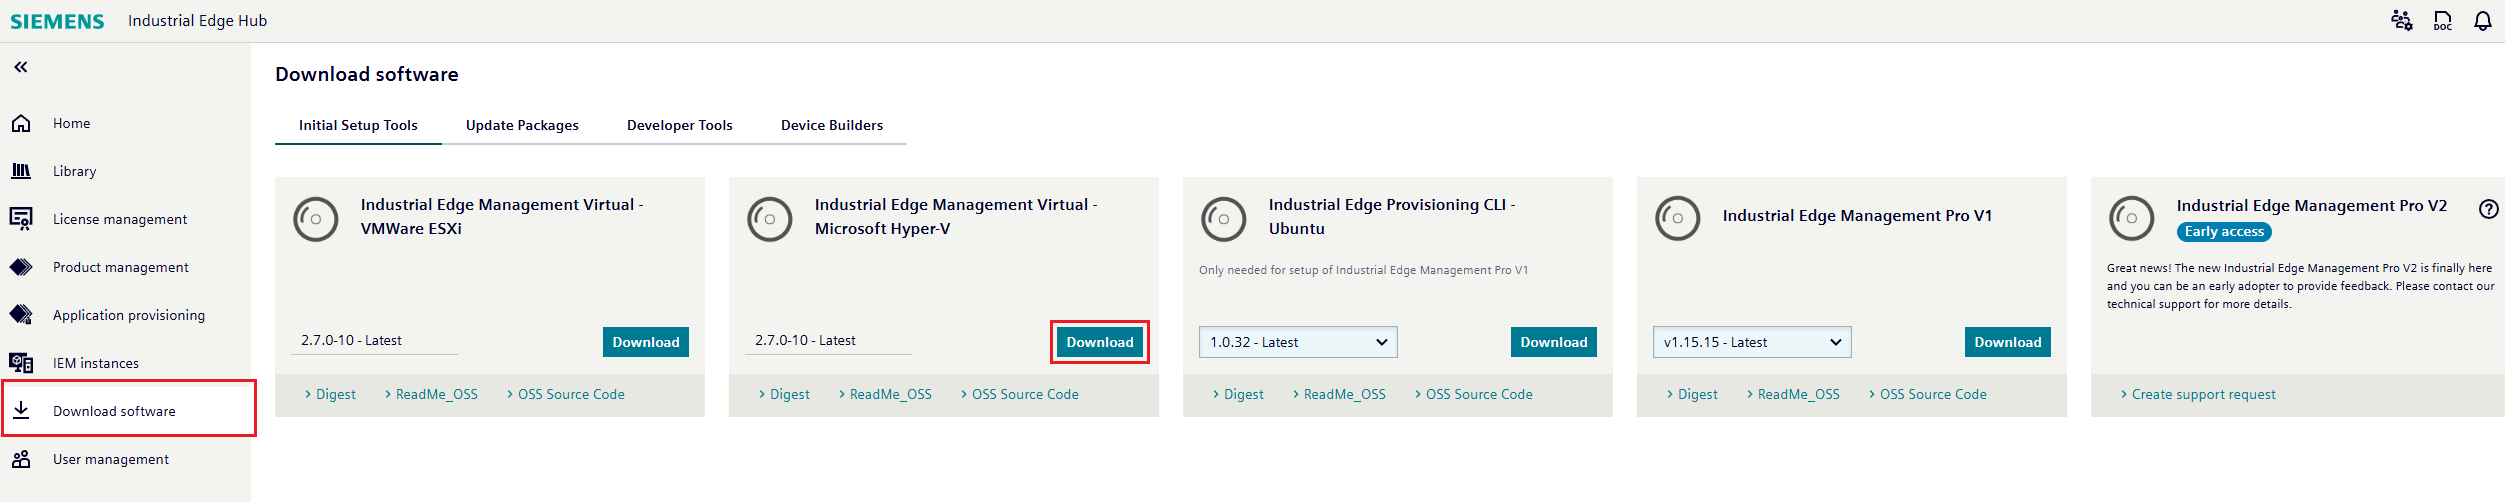
-
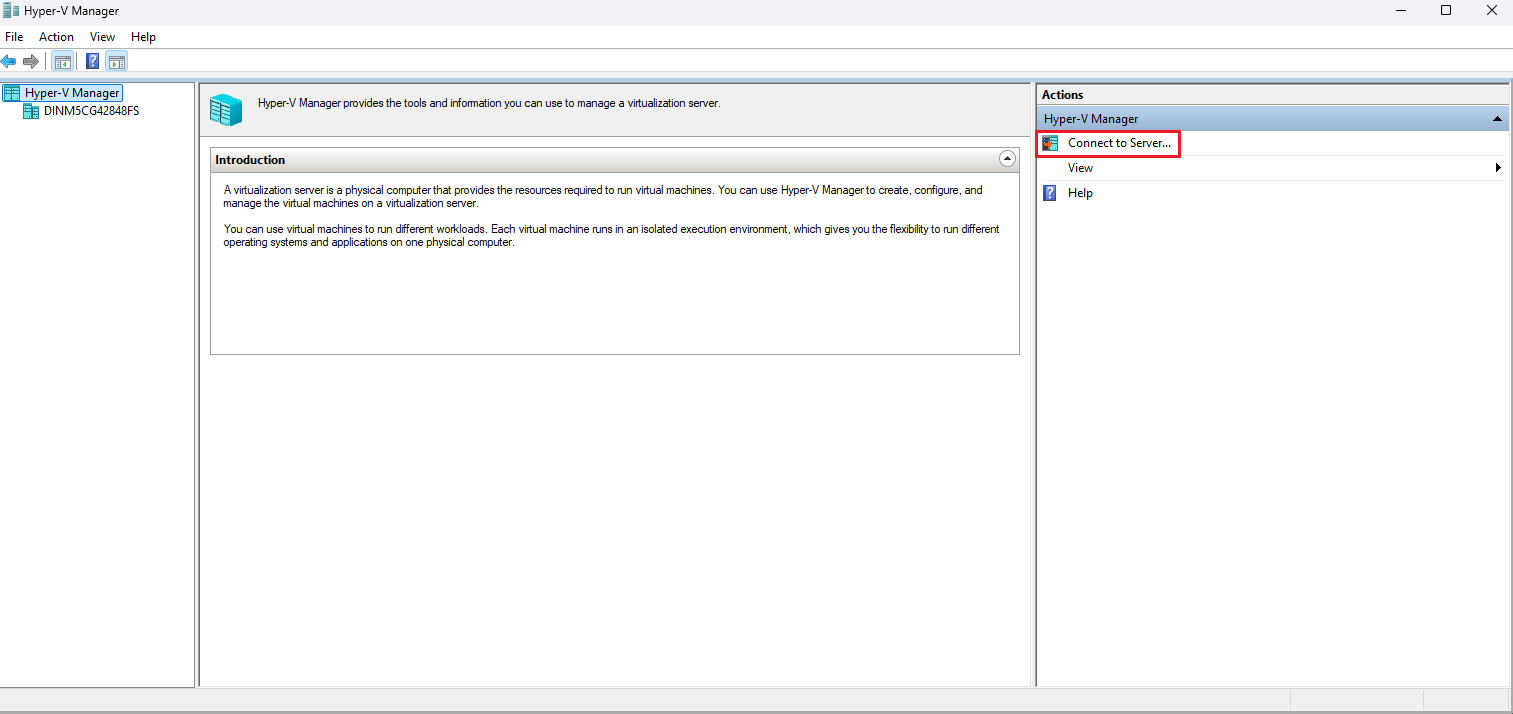
Open Hyper-V Manager.
-
In the right-hand "Actions" pane, click "Connect to Server...".
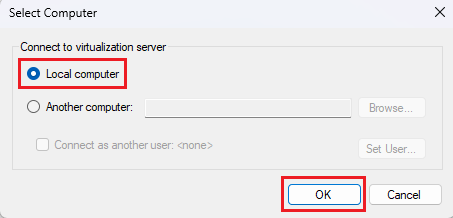
-
Select "Local computer" and click "OK".
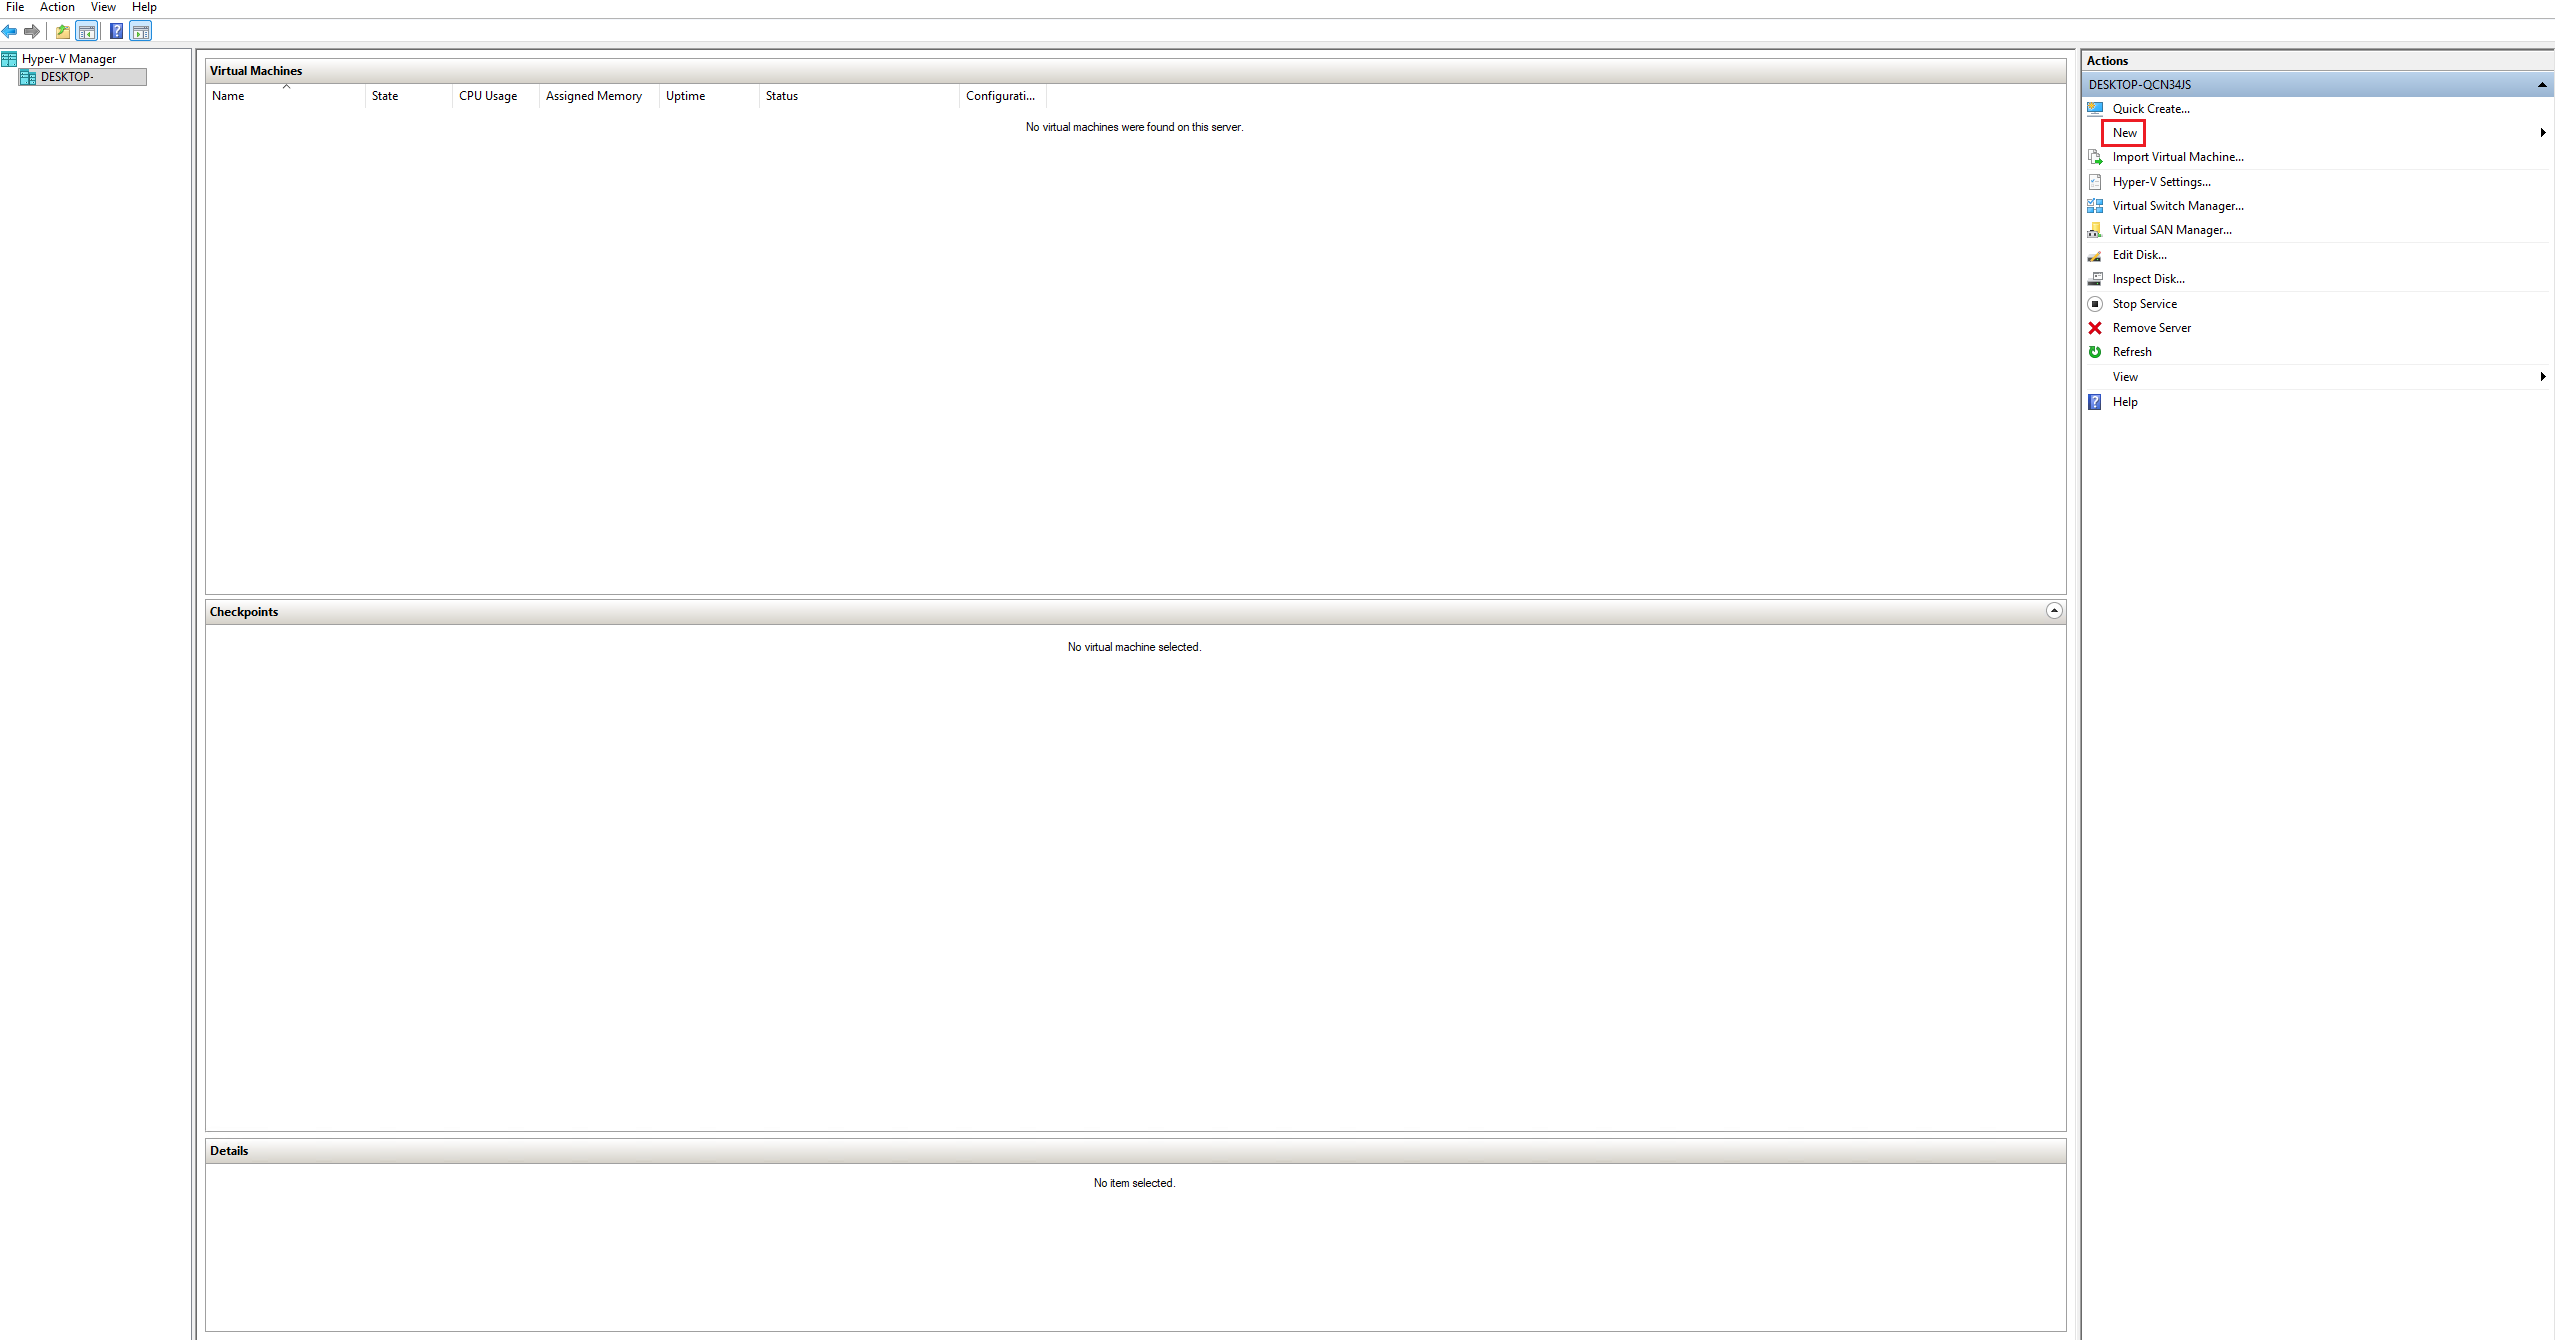
-
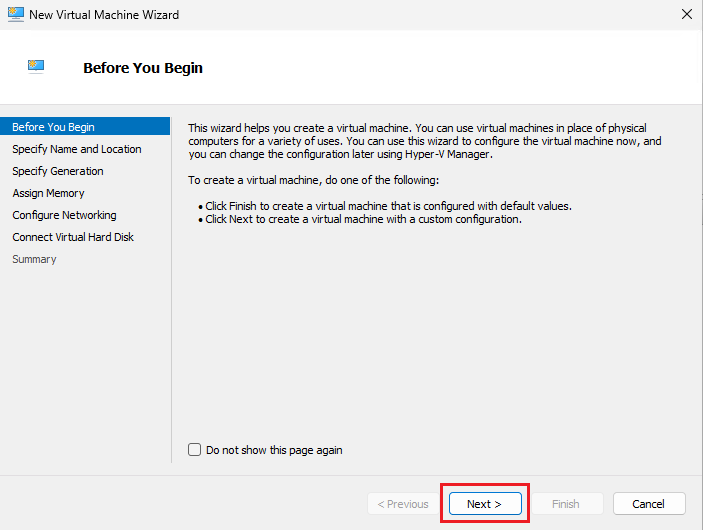
In the right "Actions" pane, click "New" to open the "New Virtual Machine Wizard".
-
In the "New Virtual Machine Wizard", click "Next".
-
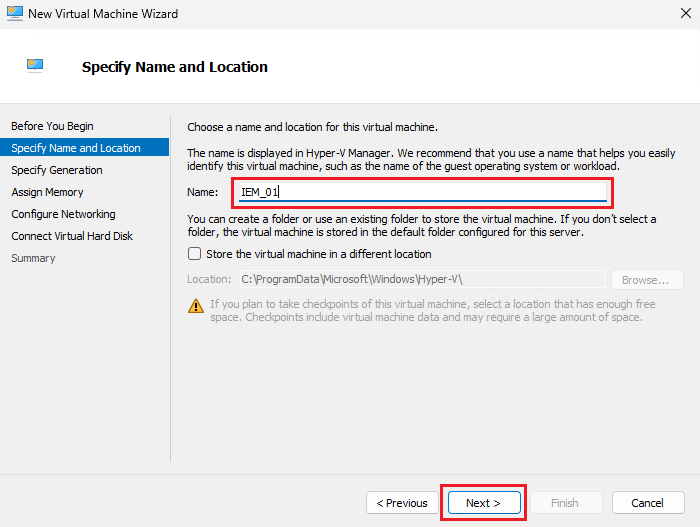
Enter a name for the virtual machine. Use clear, descriptive (e.g., IEM-Virtual-Prod) naming conventions. Change the default store path if needed. Click "Next".
-
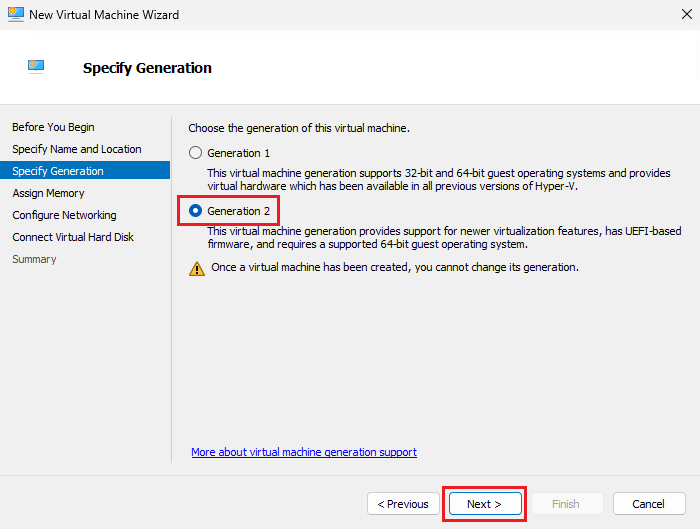
Choose "Generation 2" and click "Next".
-
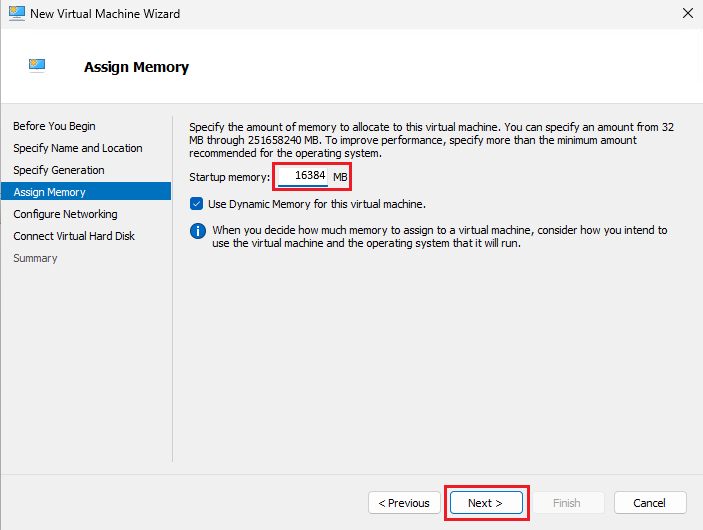
Enter the amount of memory to allocate. The memory allocated must be above 16 GB, the minimum memory requirement for IEM Virtual. Uncheck "Use Dynamic Memory for this virtual machine." Click "Next".
NOTICE
Make sure to disable Dynamic Memory to avoid issues with the virtual machine later.
-
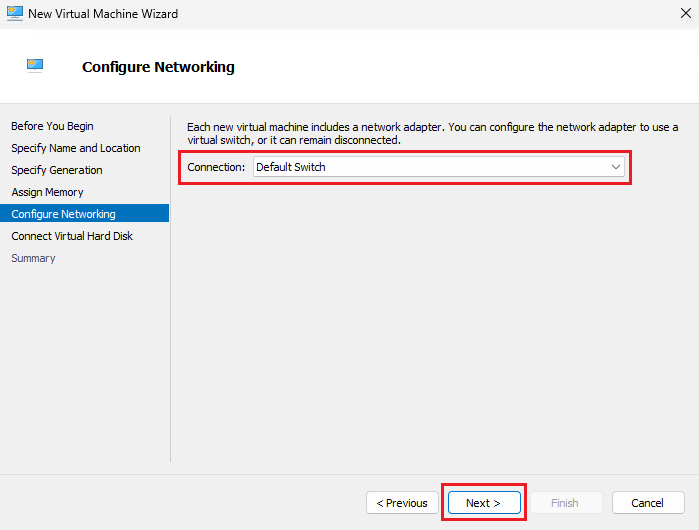
Choose a virtual switch according to your network setup. This guide uses the "Default Switch". Click "Next".
-
Select "Use an existing virtual hard disk". Browse to the downloaded IEM
.vhdxfile, select it, and click "Next".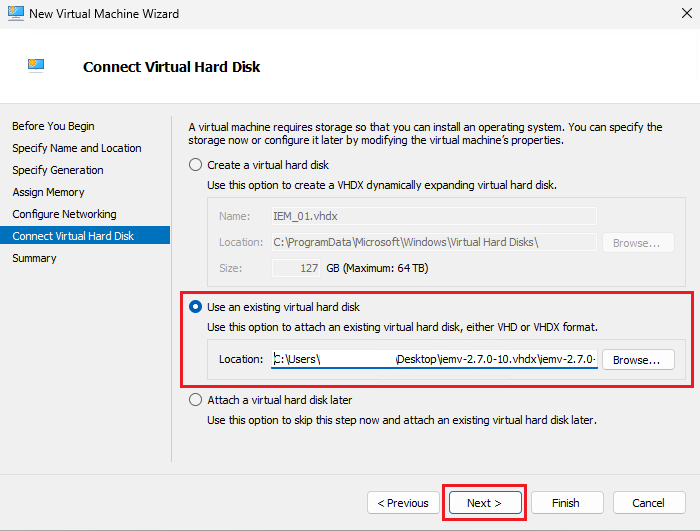
-
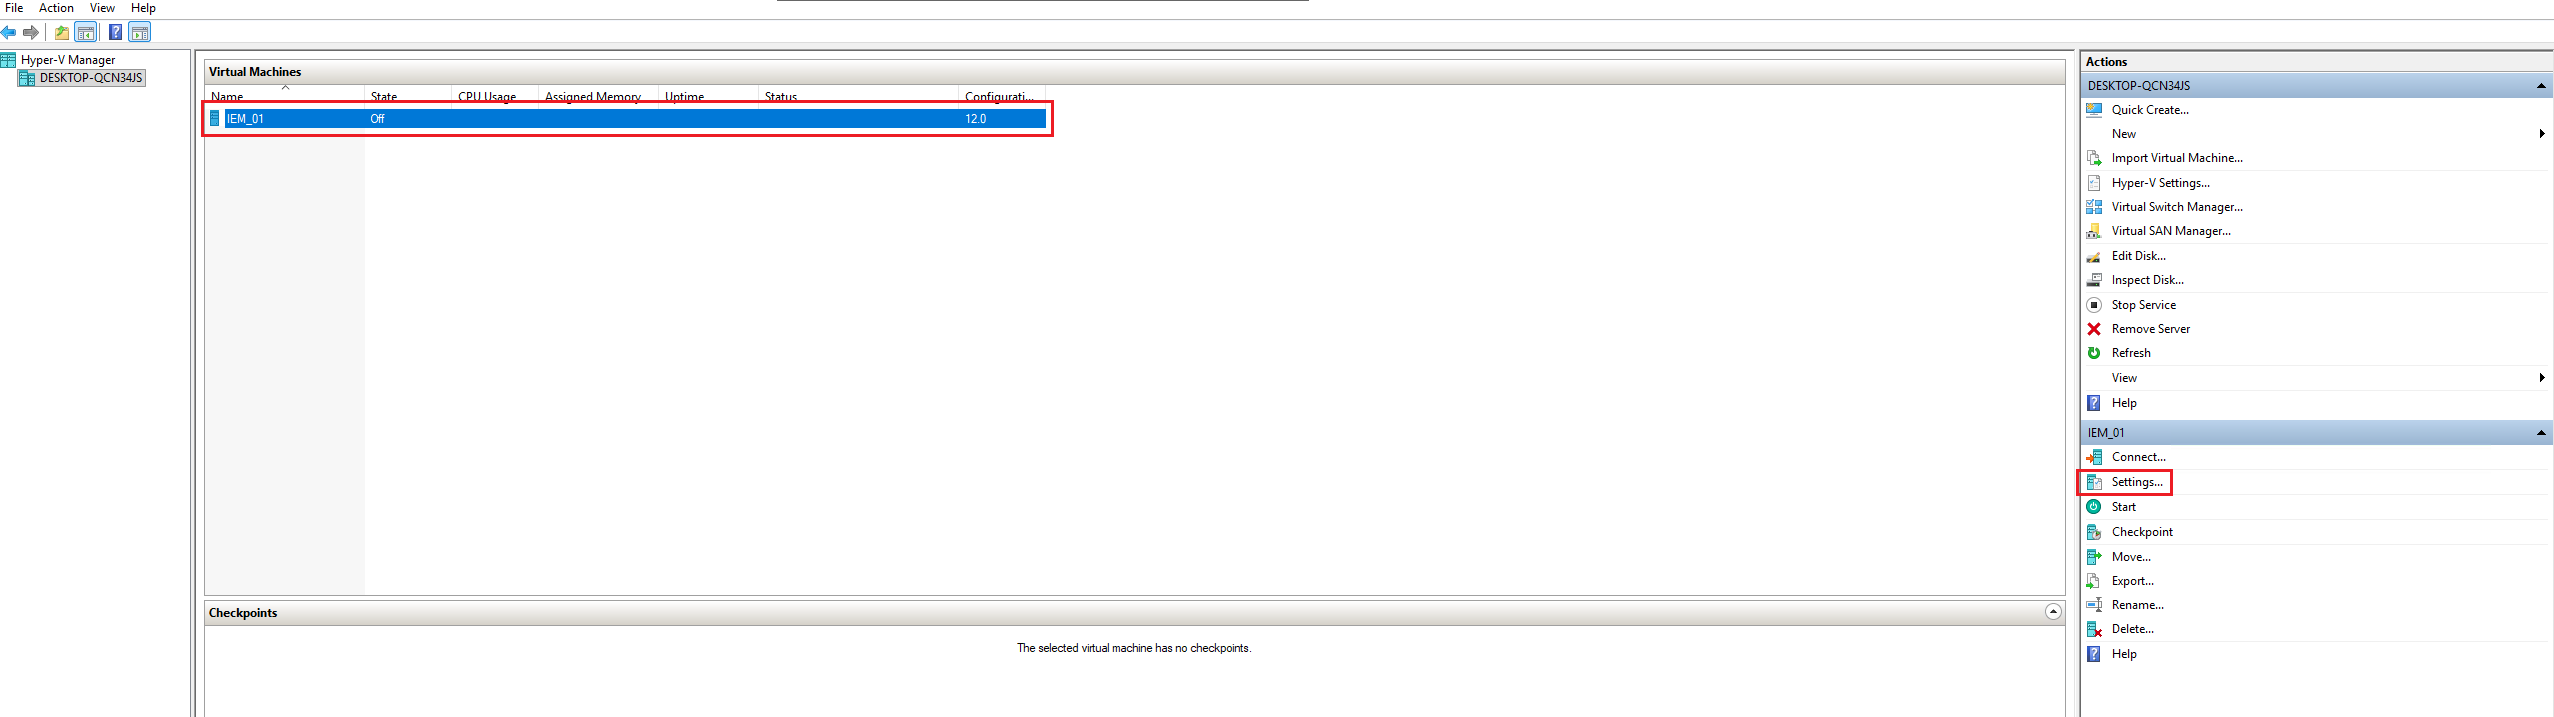
Review the configuration and click "Finish". Hyper-V creates the virtual machine and it appears under "Virtual Machines".
Configuring the VM settings
-
Select the previously created virtual machine and click the "Settings" button in the bottom-right pane.
-
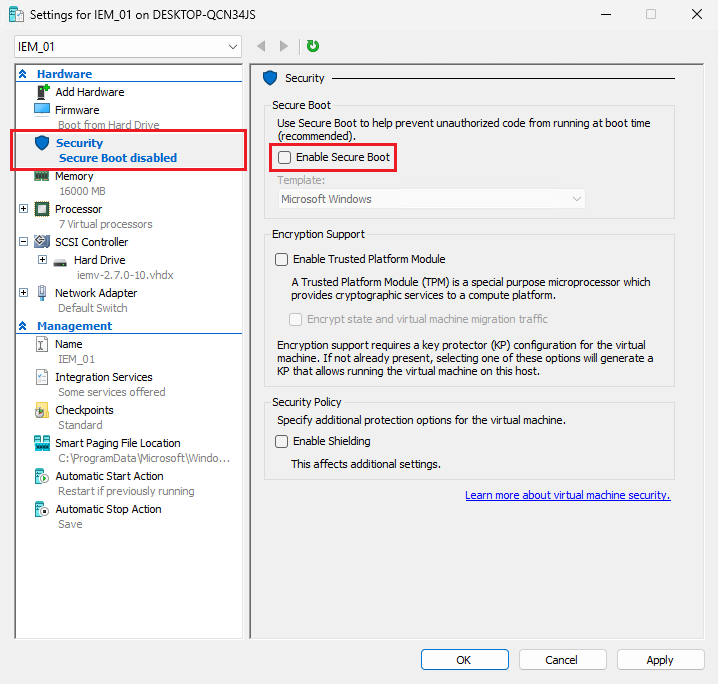
In the left pane, select "Security" and clear "Enable Secure Boot".
-
In the left pane, select "Processor", set the number of processors, and click "Apply".
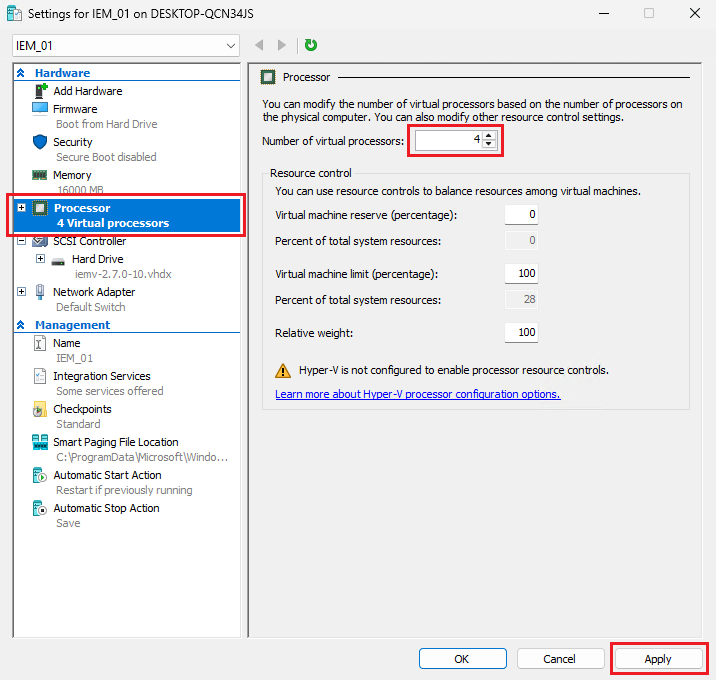
-
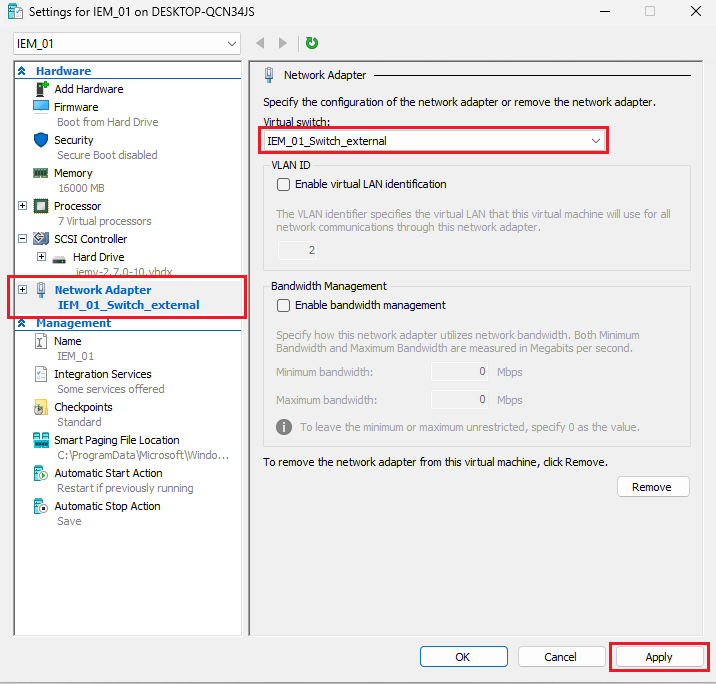
Optional: In the left pane, select "Network Adapter", choose a suitable network adapter, click "Apply", then click "OK".
Choosing the Right Virtual Switch
Use an External switch for production—supports both static and DHCP without extra host configuration and ensures stable Layer 2 connectivity. The Default Switch relies on NAT and dynamic addressing and is unsuitable for production stability. An Internal switch is viable only when you will manually provide routing/NAT/DHCP from the host.
Booting the virtual machine and accessing the UI
-
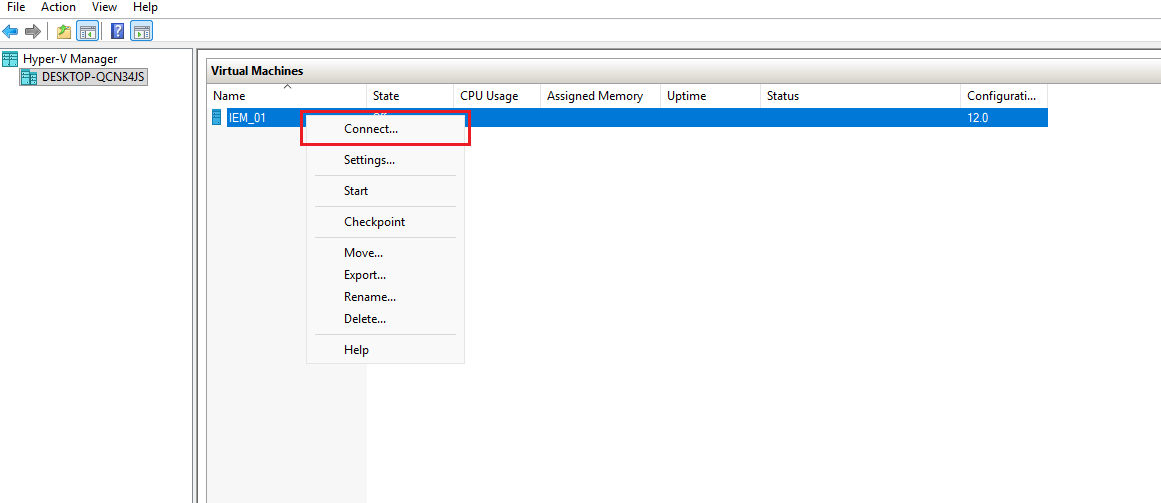
Right-click the virtual machine, select "Connect", then click "Start".
-
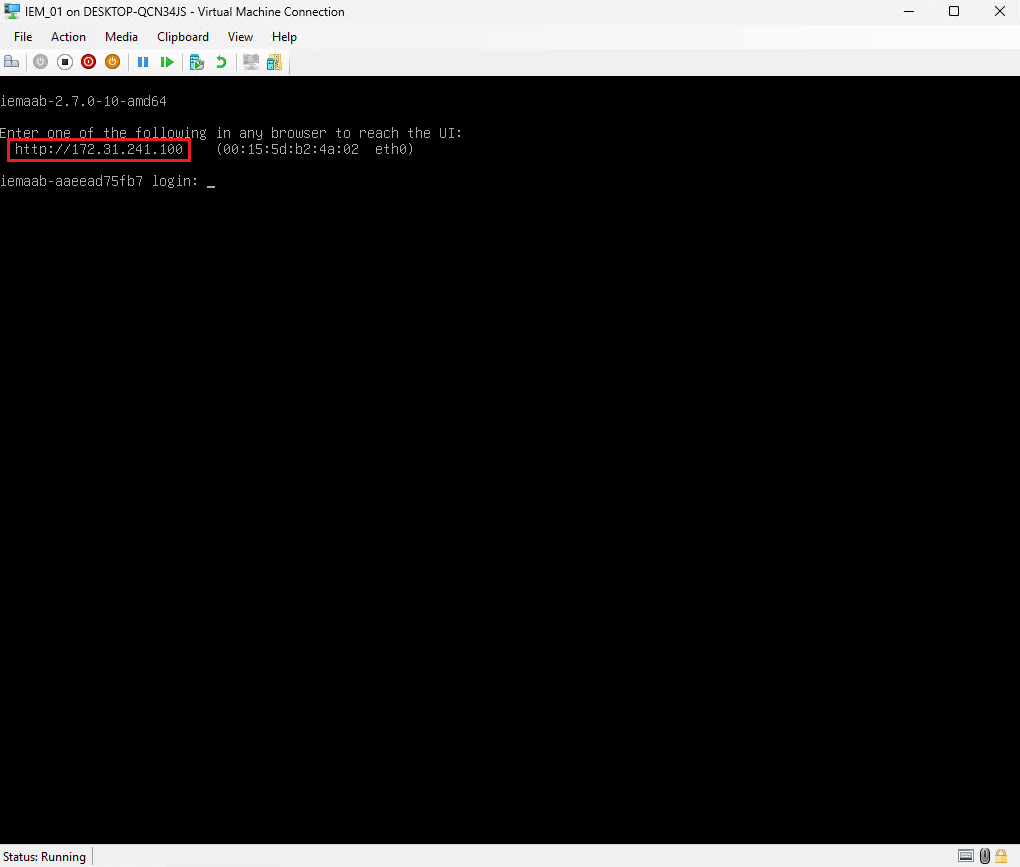
The virtual machine's console display appears. Note the shown IP address and use it in a browser to continue with the setup.
Static IP Configuration
If there is no DHCP server available in your environment, configure a static IP address from the console so you can access the First Boot Wizard for further configurations. Proceed with Initial Network Configuration to set up a static IP address.
NOTICE
Do not reduce CPU or RAM during onboarding.
Troubleshooting
Symptom Possible cause Action Secure Boot violation message Secure Boot still enabled Disable in VM Settings > Security and retry boot. No network / APIPA address Wrong switch type or DHCP unavailable Switch to an external switch or configure a static IP address. Slow onboarding Insufficient resources or Dynamic Memory enabled Ensure 4 vCPU, 16 GB RAM, and Dynamic Memory disabled. VHDX not listed File still compressed or permissions issue Ensure extraction completed and check NTFS permissions.
Downloading and creating the virtual machine
- Open Industrial Edge Hub.
- Click "Download software" from the left navigation pane. The "Download software" page opens.
-
Click "Download" on the tile named "Industrial Edge Management Virtual - VMWare ESXi". Save the file locally. The
.ovafile downloads.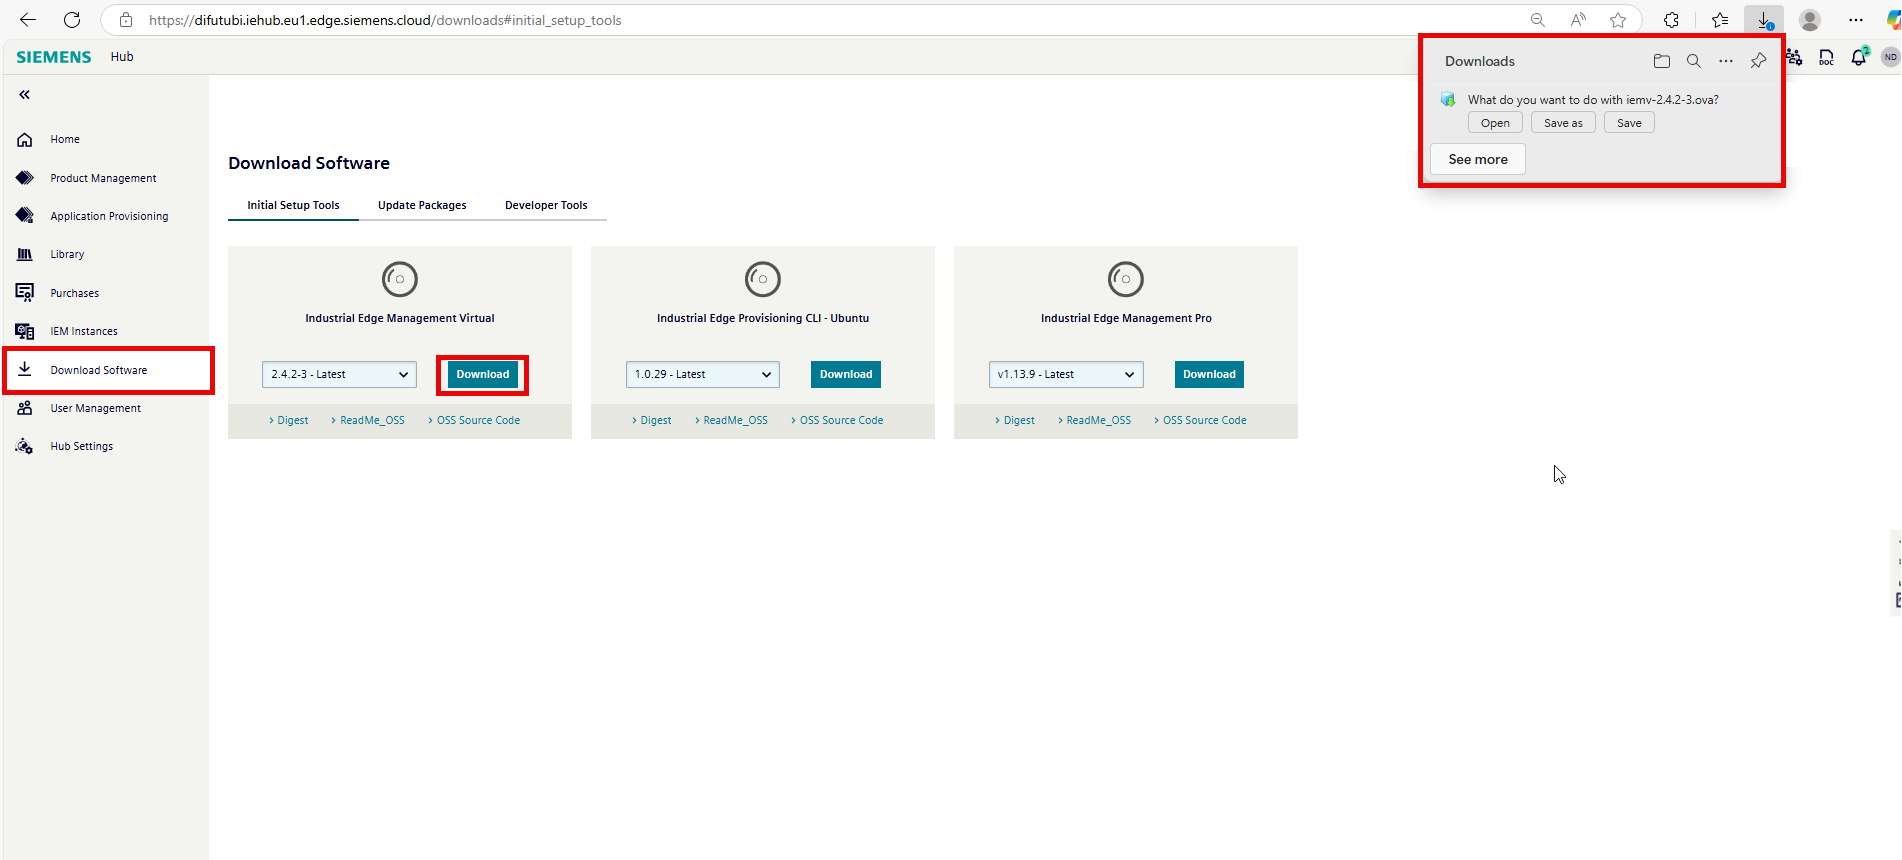
-
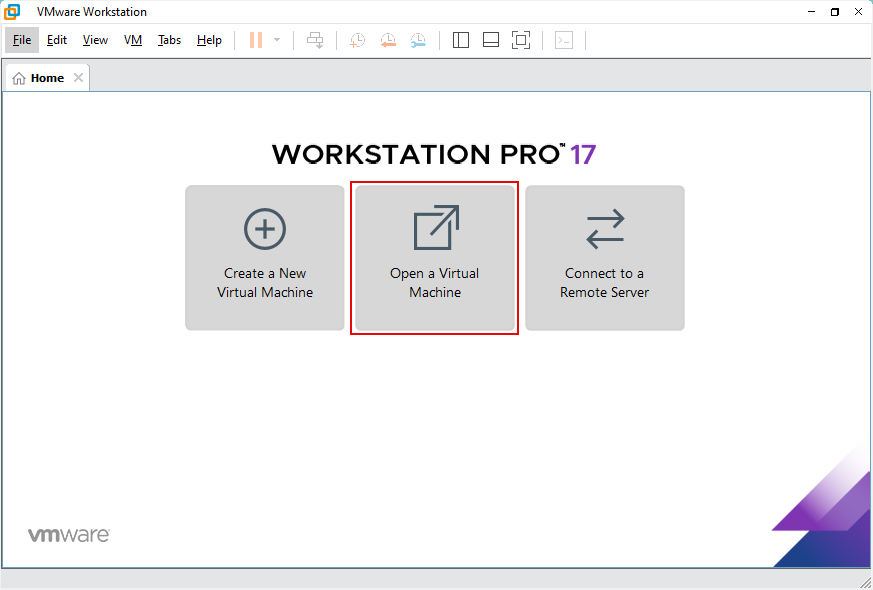
Open VMware Workstation Pro.
-
Click "Open a Virtual Machine".
-
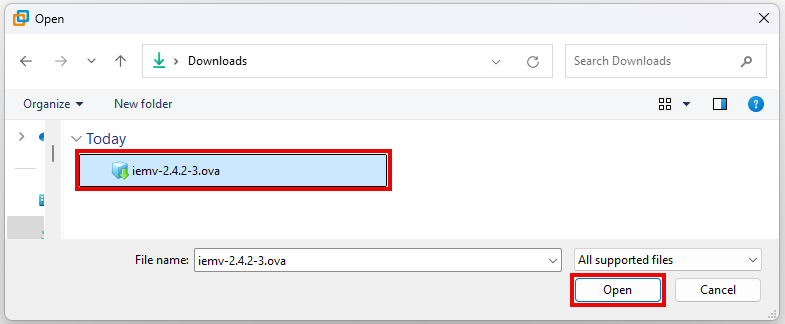
Select the
.ovafile downloaded from IE Hub. -
Name the virtual machine and select a storage path. Use clear and descriptive (e.g., IEM-Virtual-Prod) naming conventions.
-
Click "Import". VMware Workstation creates a virtual machine.
NOTICE
Do not reduce CPU or RAM during onboarding.
Configuring the virtual machine network adapter for IEM Virtual
The following steps show how to configure the IEM Virtual network adapter in VMware.
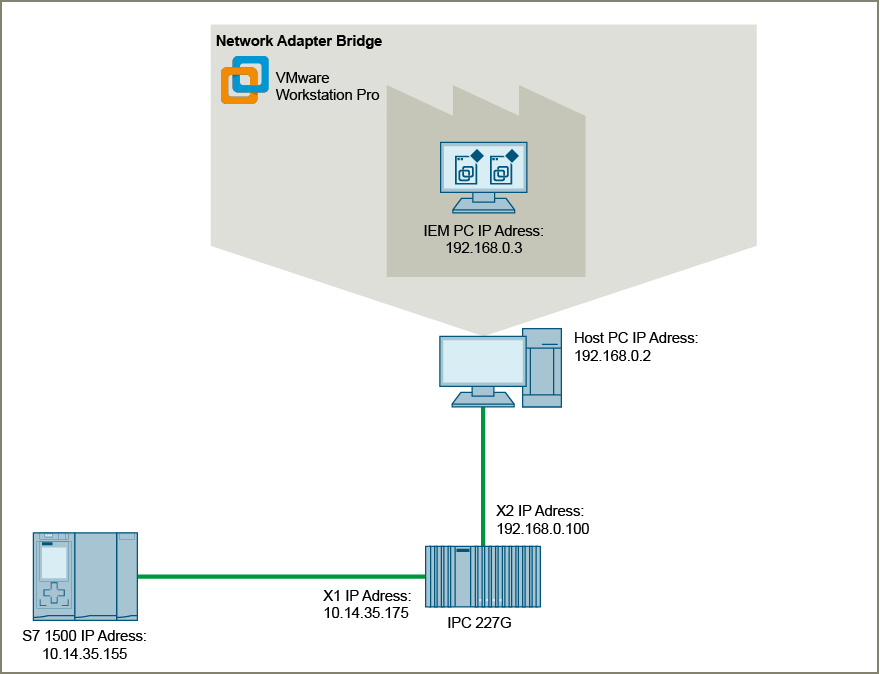
VMware uses a Network Address Translation (NAT) adapter by default, which prevents external devices from communicating with IEM Virtual. Change the adapter type to "Bridged" to allow IEM Virtual to communicate with other devices on the same network.
Both IEM Virtual and the IE Device must be on the same network adapter to communicate effectively. Setting the IEM Virtual network adapter to "Bridged" mode ensures this connectivity. Using any other network adapter type prevents communication between the IE Device and IEM Virtual.
- Open the hypervisor for the virtual machine.
- Select the virtual machine for IEM Virtual.
-
Click "Edit virtual machine settings". The "Virtual machine settings" window opens.
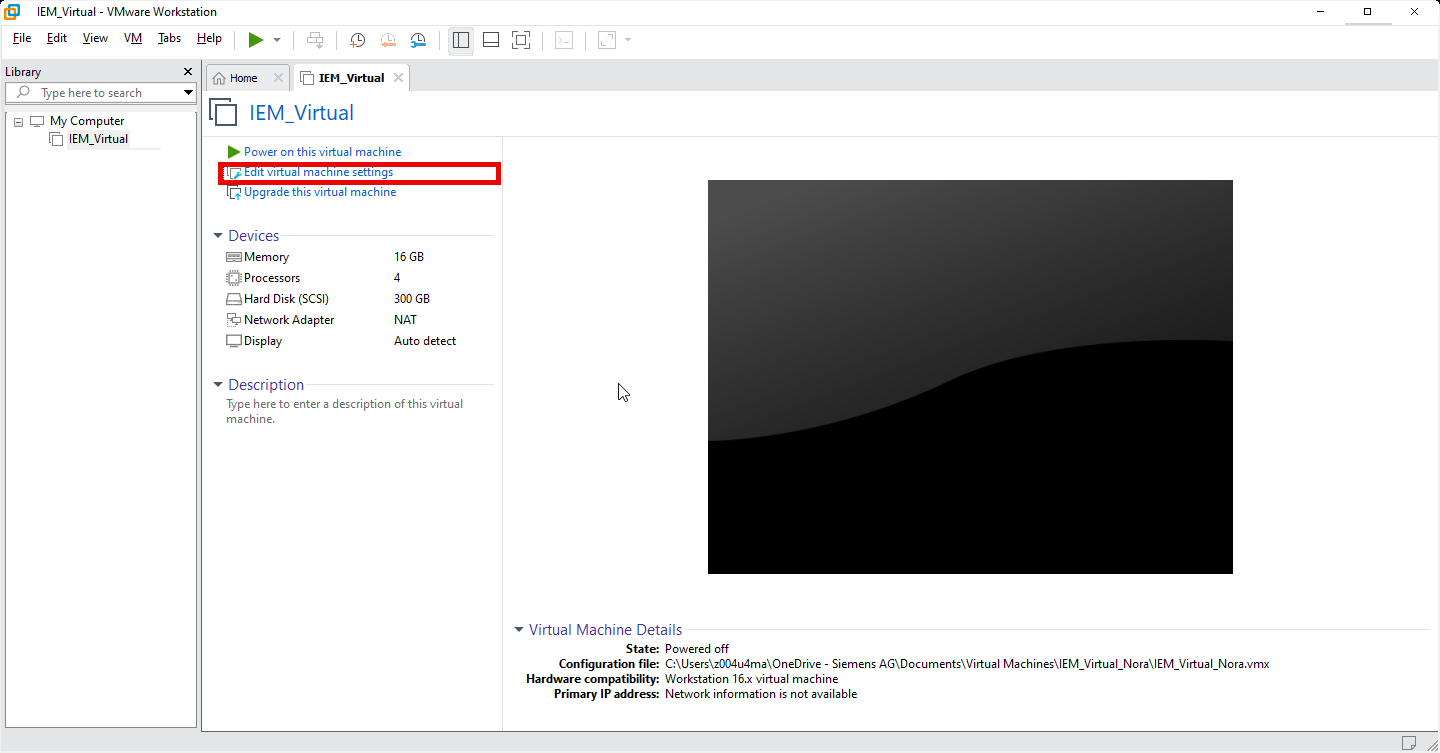
-
Click "Network Adapter" in the left panel. The right panel displays information about the network adapter.
-
Set the "Network Connection" to "Bridged". Select "Replicate physical network connection state".
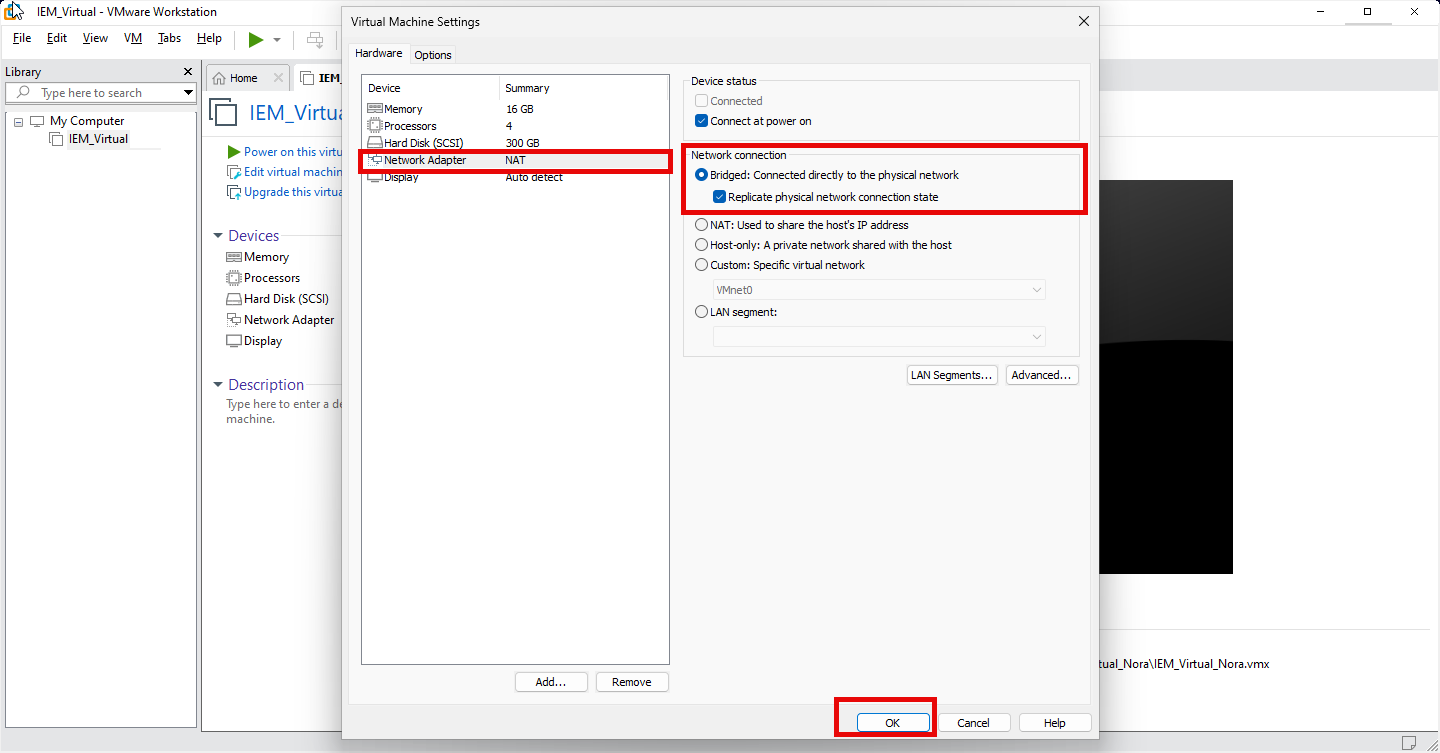
-
Click "OK".
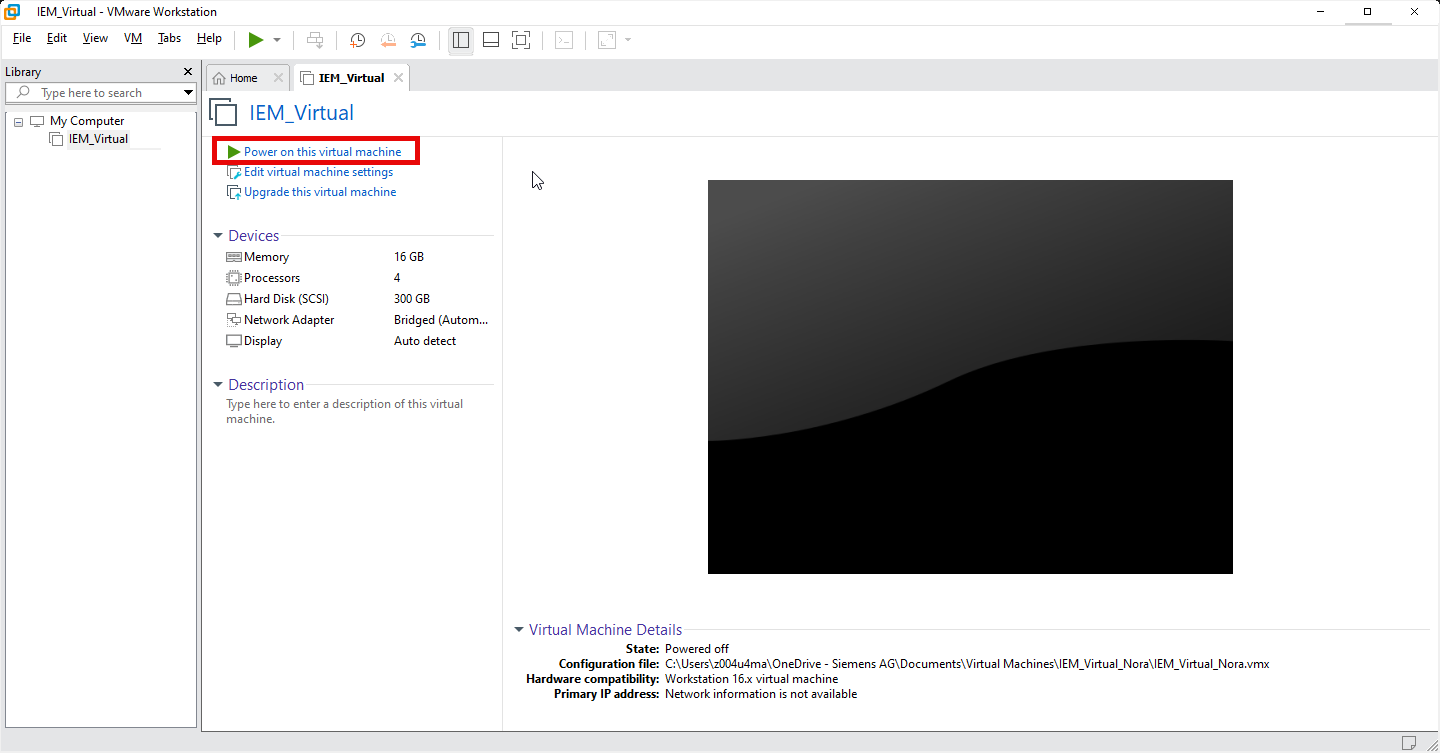
-
To turn on your virtual machine, click "Power on this virtual machine". The virtual machine powers on.
Downloading and creating the virtual machine
- Open Industrial Edge Hub.
- Click "Download software" from the left navigation pane. The "Download software" page opens.
-
Click "Download" on the tile named "Industrial Edge Management Virtual - VMWare ESXi". Save the file locally. The
.ovafile downloads. -
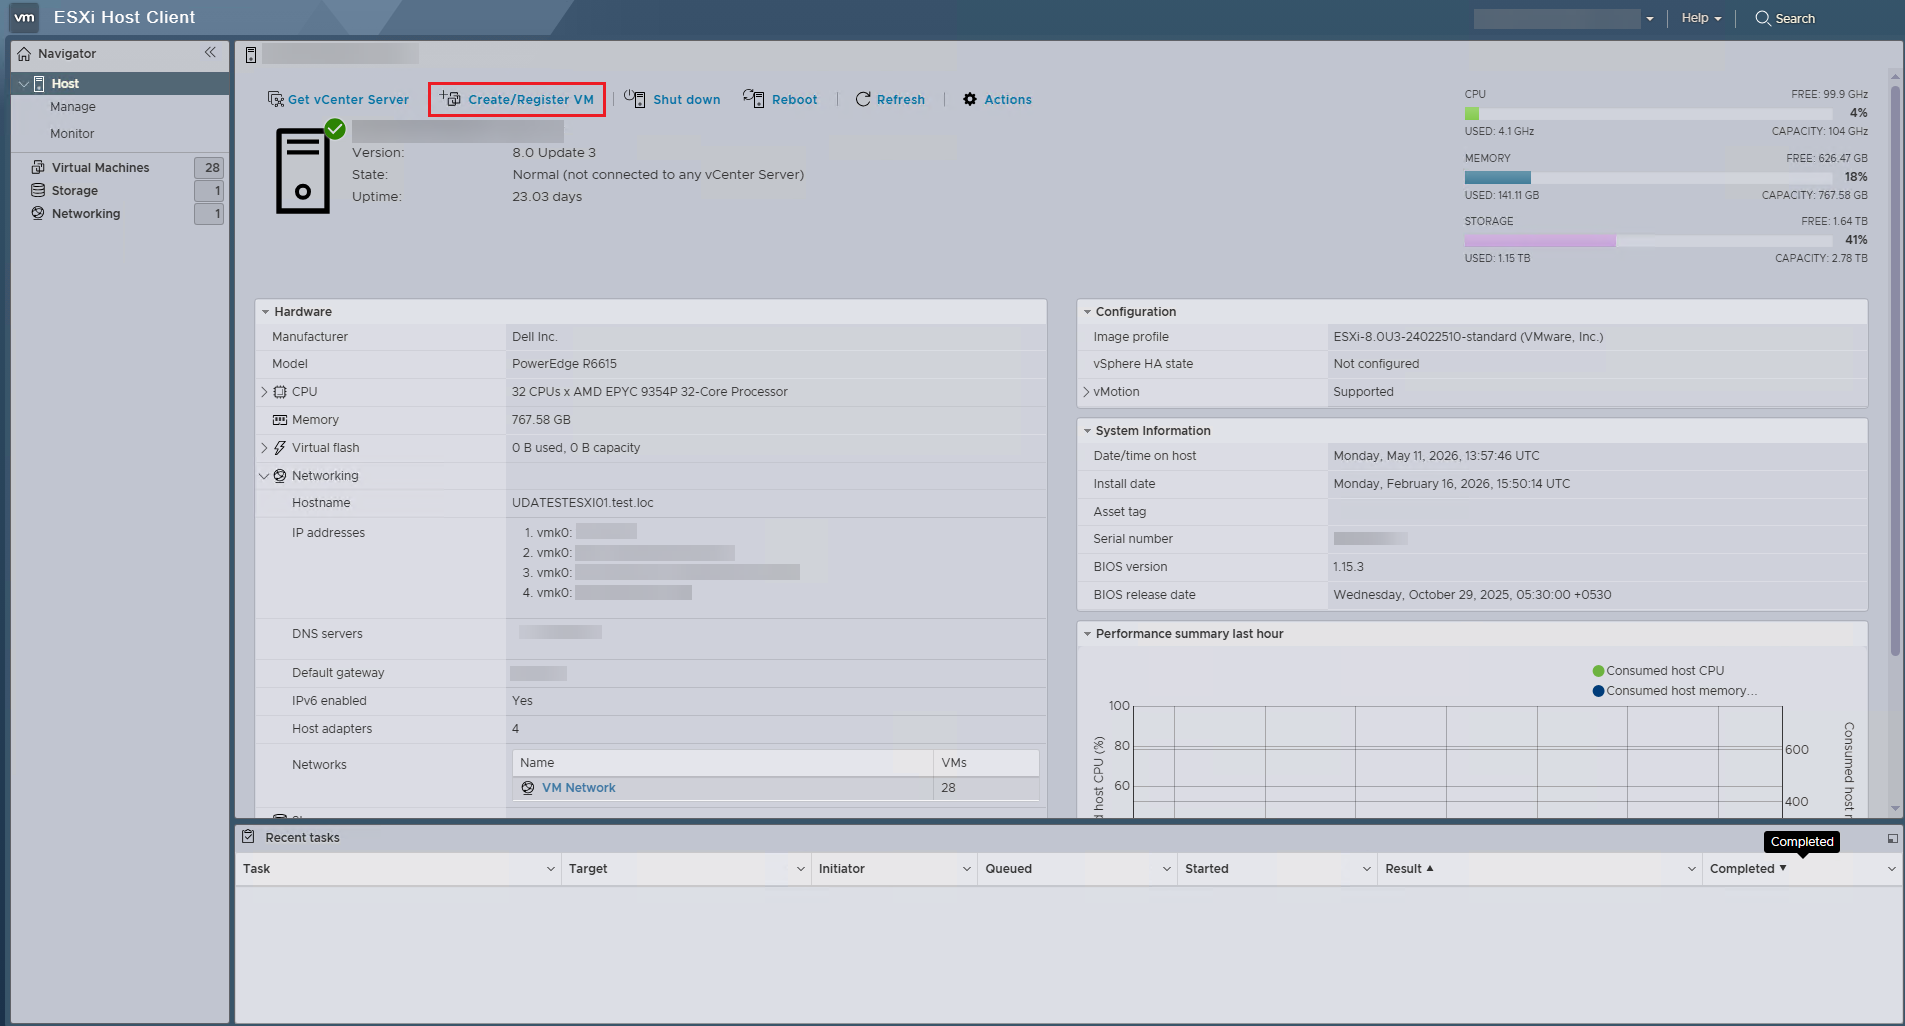
Open VMware ESXi.
-
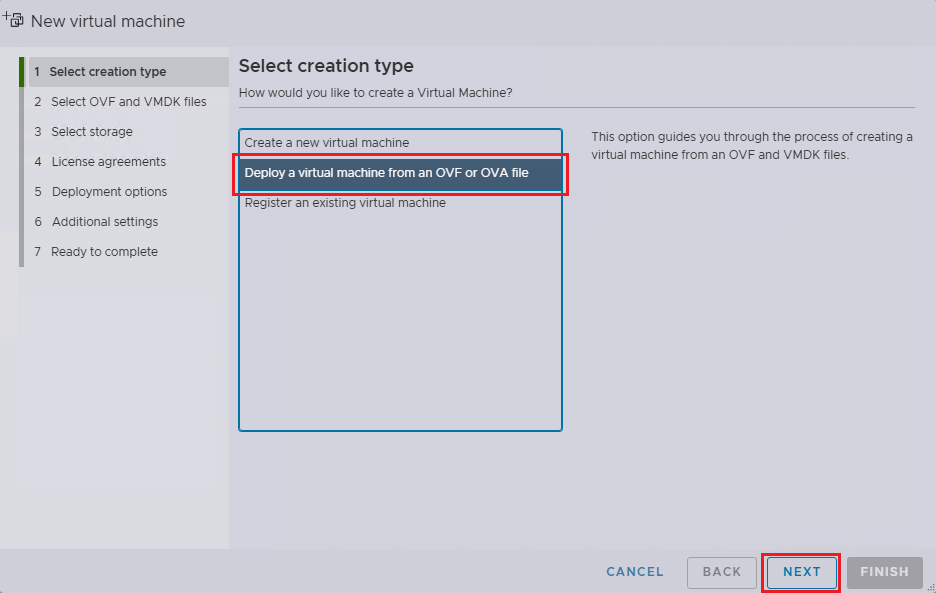
Click "Create/Register VM" in the middle panel. The "New Virtual Machine" wizard opens.
-
Select "Deploy a virtual machine from an OVF or OVA file".
-
Click "NEXT". The "Select OVF and VMDK files" page opens.
-
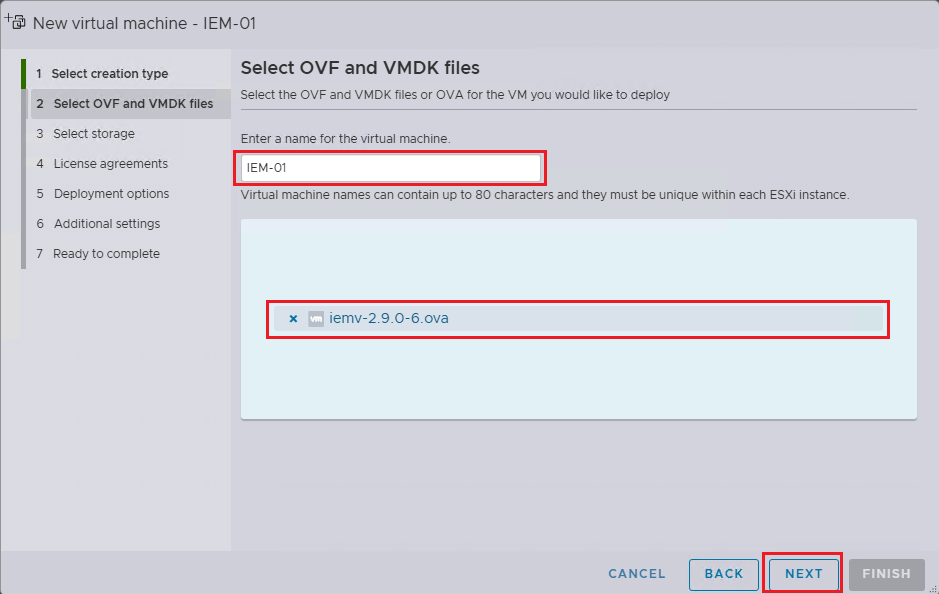
Enter a name for the IEM in the upper text field.
-
Select the previously downloaded
.ovafile. - Click "NEXT". The "Select storage" page opens.
-
Select the storage type. Choose a datastore if different from the default.
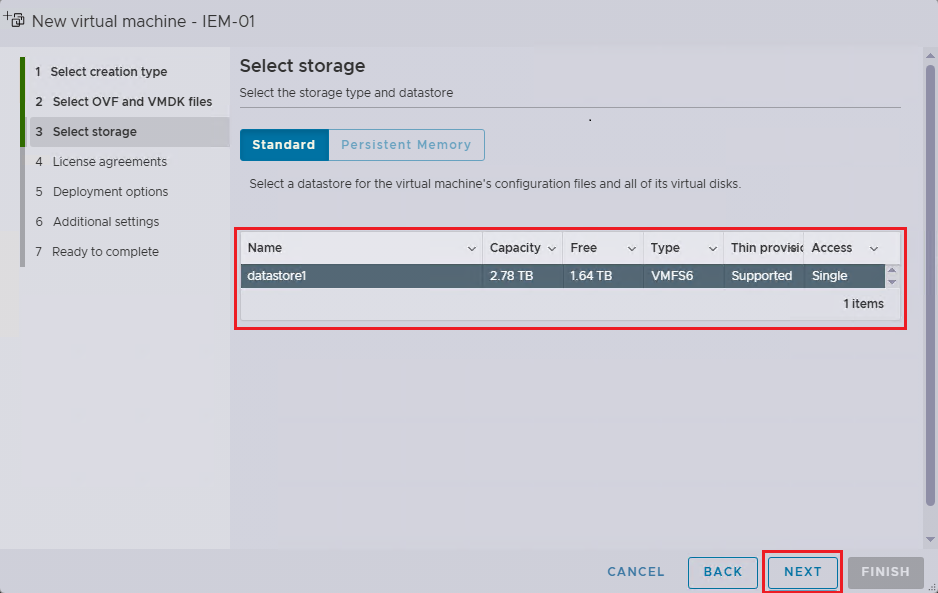
NOTICE
Insufficient storage can damage the IEM Virtual installation.
-
Click "NEXT". The "Deployment options" page opens.
-
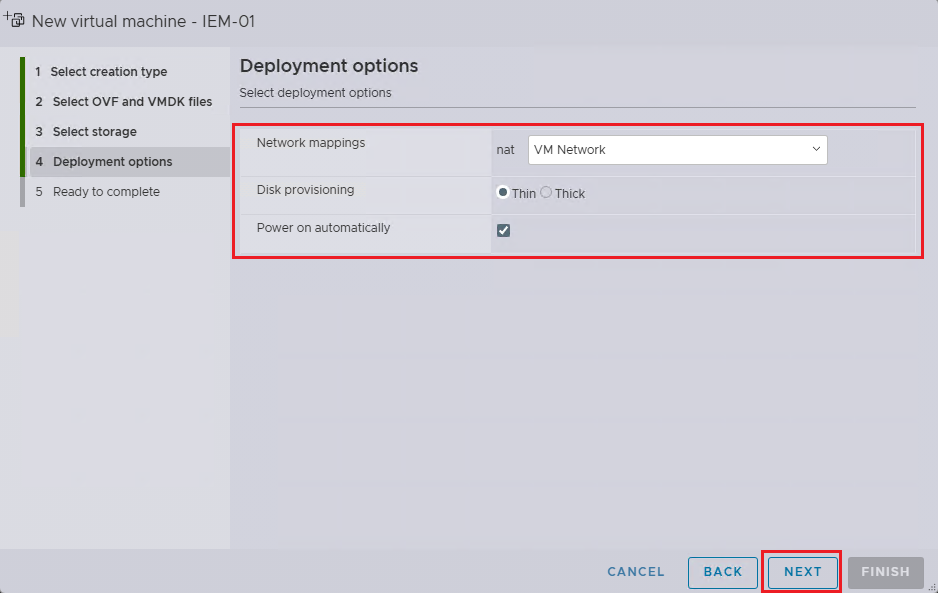
- Network mapping - Use the default or change as needed.
- Disk Provisioning - Thin (this is required).
- Power on automatically - If unchecked, the user must manually power on the VM after creation.
Select the deployment options:
-
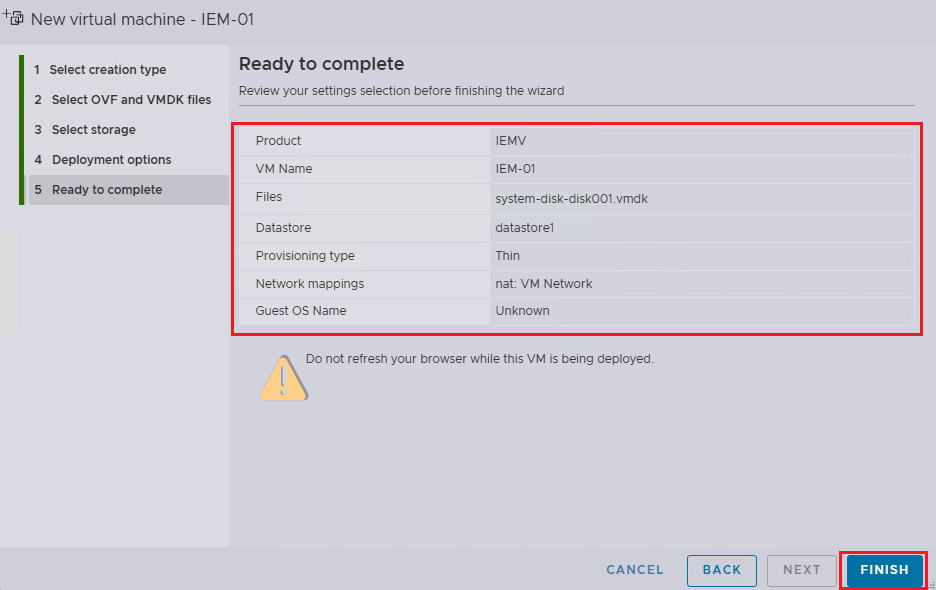
Click "NEXT". The "Ready to complete" page opens.
-
Review your selections. Click "FINISH". ESXi creates the IEM Virtual VM.
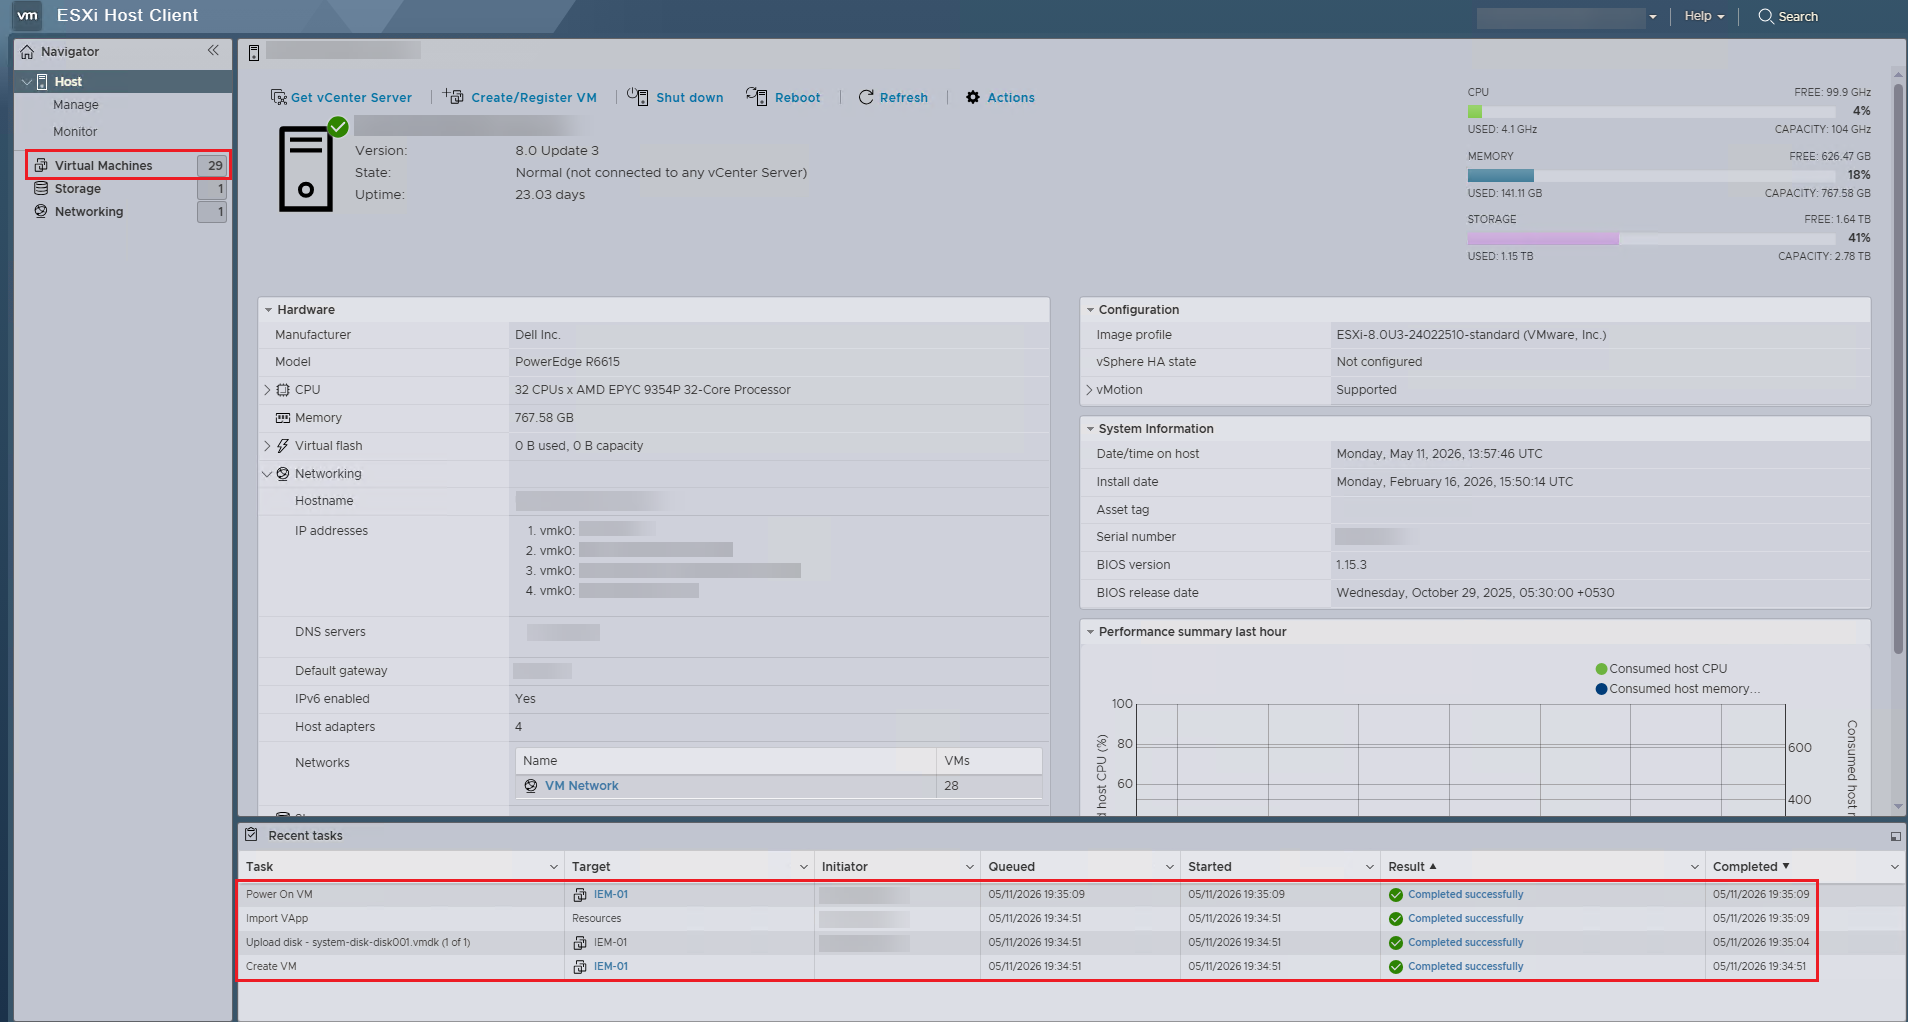
-
Check the logs in the bottom-center panel under "Recent Tasks" to verify that the IEM Virtual VM was created successfully.
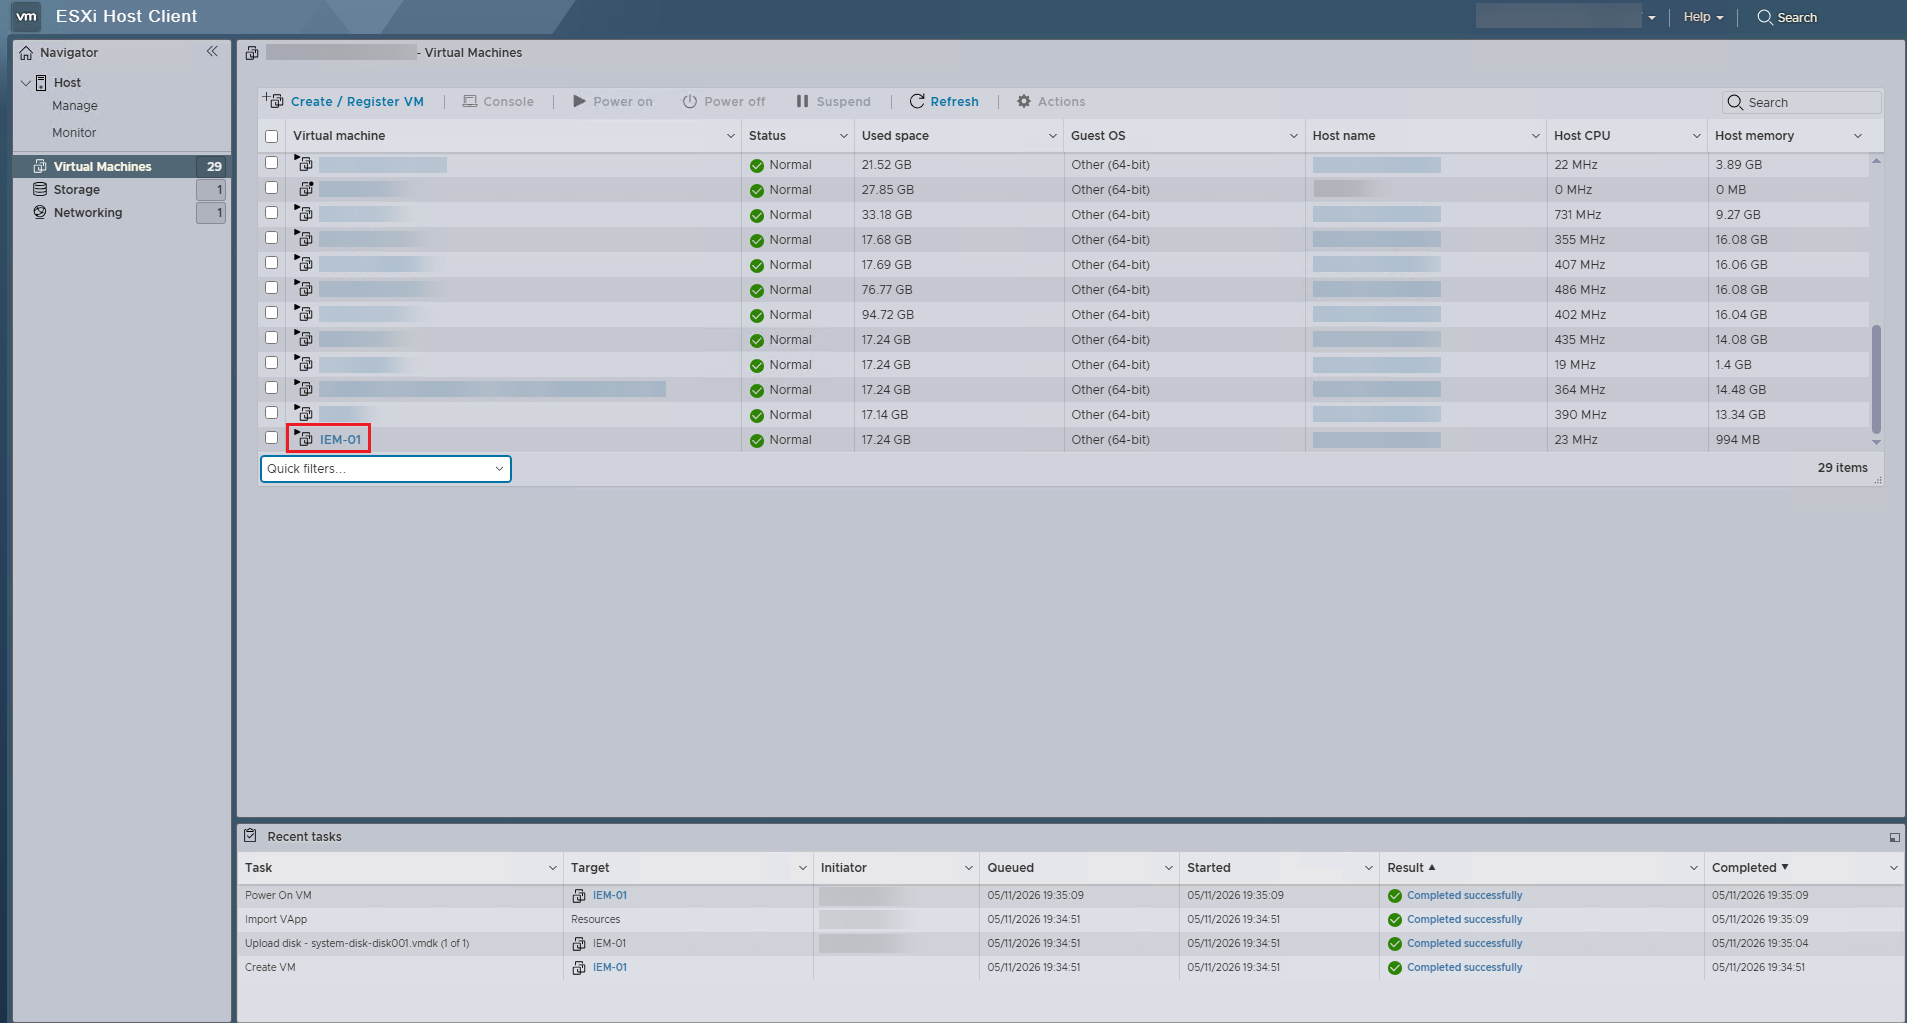
-
In the left "Navigator" panel, select "Virtual Machines". A list of available virtual machines appears in the middle panel.
-
Click on the newly created Virtual Machine. Usually, this can be found at the bottom.
-
Click "Console". A drop-down list of console options appears.
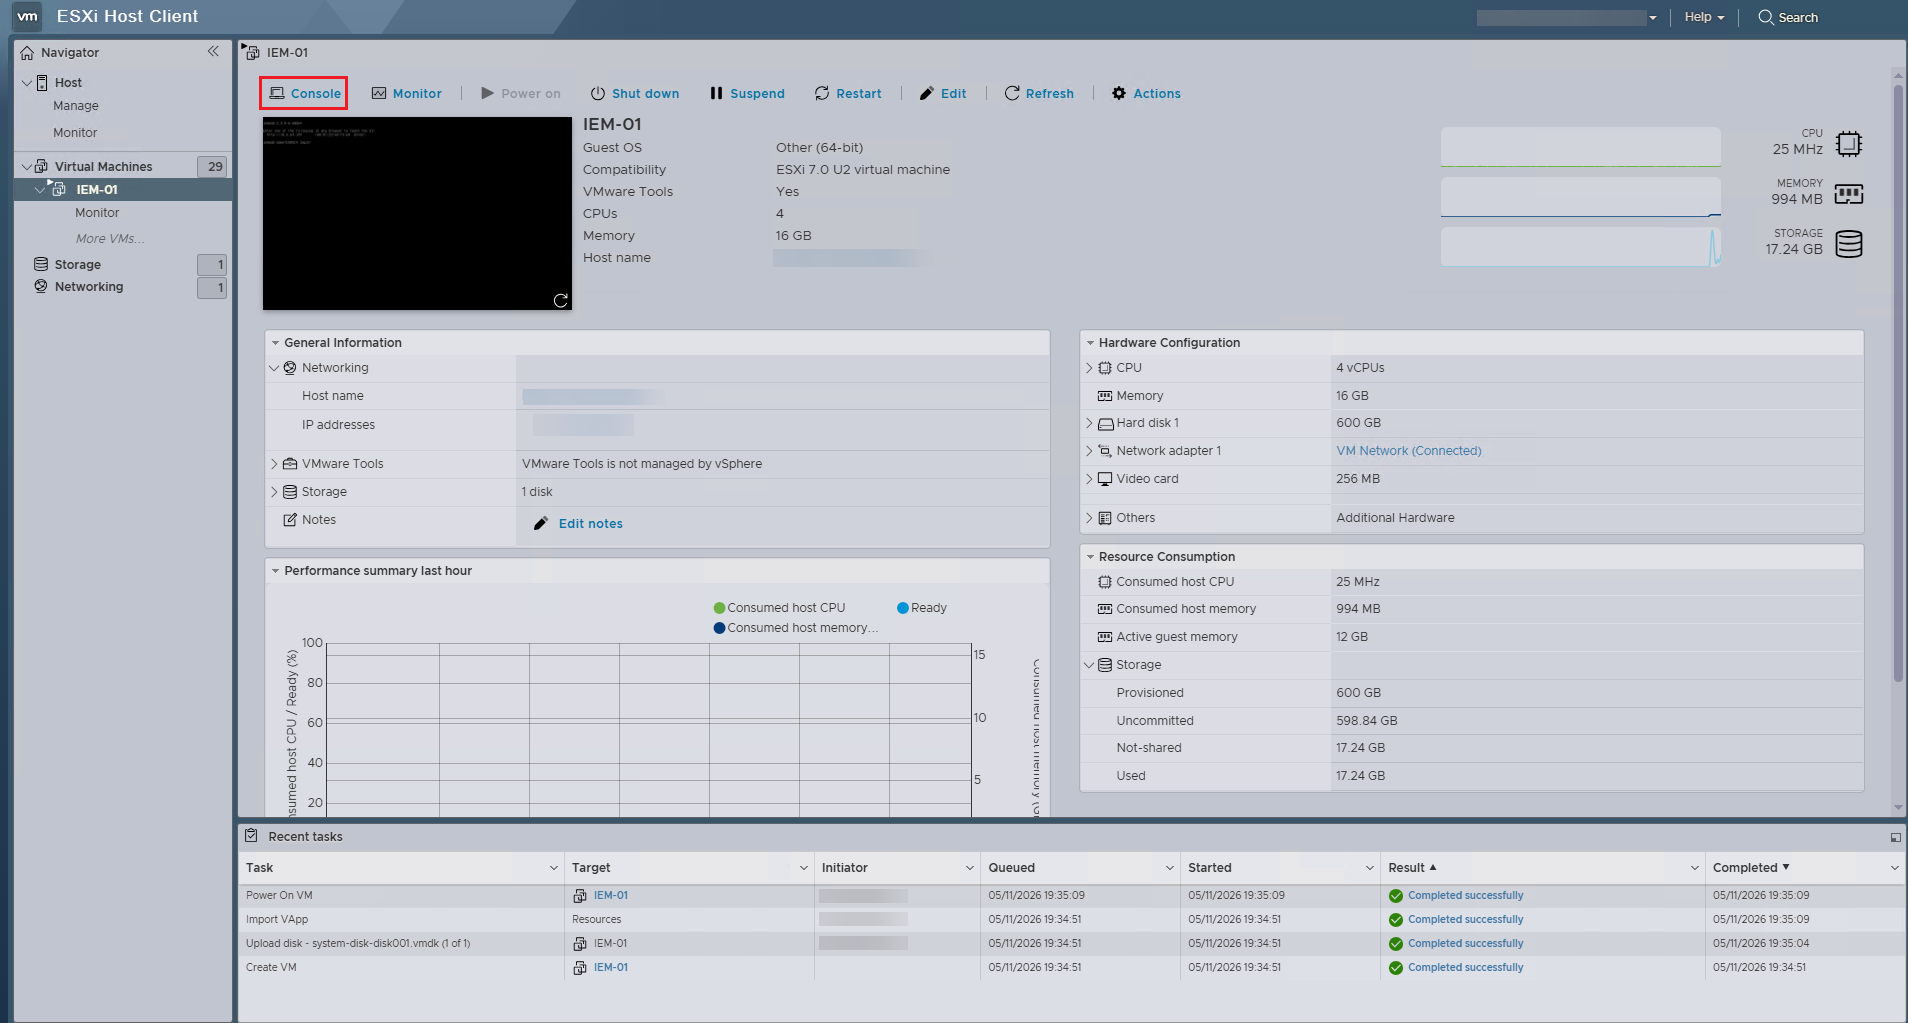
-
Select "Open browser console". The console for the virtual machine opens.
Obtaining a DHCP IP address
NOTICE
For productive use, use a fully qualified domain name (FQDN) that is resolvable by a DNS server. A static IP address should only be used for testing or development.
While booting up, the virtual machine obtains an IP address from the Dynamic Host Configuration Protocol (DHCP) server. The virtual machine displays this IP address on the console. This IP address is necessary for connecting IEM Virtual to the IE Device.

Note down the IP address of the virtual machine. Proceed to Creating and downloading the deployment file.
If the network does not have a DHCP server, the virtual machine displays the error message "No configured network found. Check cable or DHCP server?". The virtual machine cannot access IEM Virtual without an IP address. If there is no DHCP server available or a static IP address is required, specify the network configuration by defining a static IP address. You can then access IEM Virtual from a browser on the same network.

Defining a static IP address
The virtual machine requires an IP address to access IEM Virtual. If there is no DHCP server available or a static IP address is required, specify the network configuration by defining a static IP address.
- Boot up the virtual machine in the hypervisor.
-
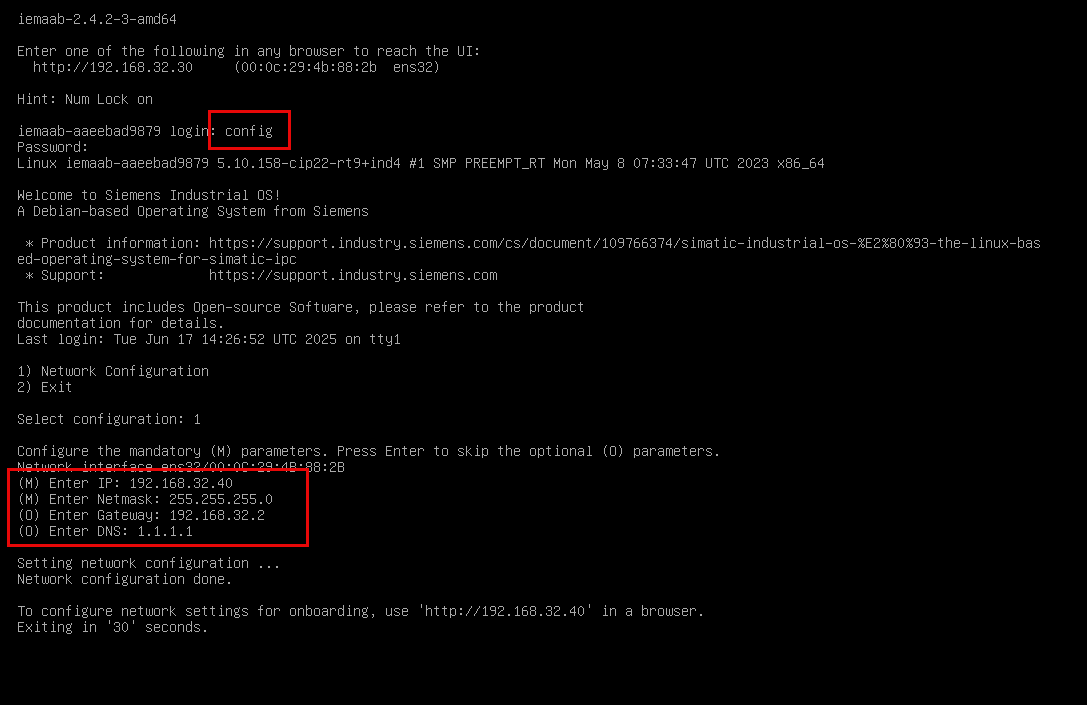
Log in with the following credentials:
login:configpassword:config
-
To select "Network Configuration", enter
1and pressEnter. -
Define the following network settings:
- IP address to assign
- Subnet
- Gateway
- DNS
-
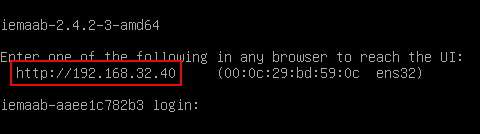
The hypervisor assigns the specified settings and IP address to IEM Virtual. The virtual machine now displays this IP address on the console while booting up. Use this IP address to reach the web server.
Proceed to Creating and downloading the deployment file.
Creating and downloading the deployment file
Use a deployment file from IE Hub to establish a secure connection between IE Hub and IEM Virtual.
The deployment file contains the IP address and Hub instances information needed by IEM Virtual to establish a secure connection to IE Hub. IEM Virtual initiates the connection and it is outbound from the secure network, avoiding any inbound access. Allowing the Hub to initiate inbound connections increases the attack surface and creates a security risk.
- Log in to IE Hub.
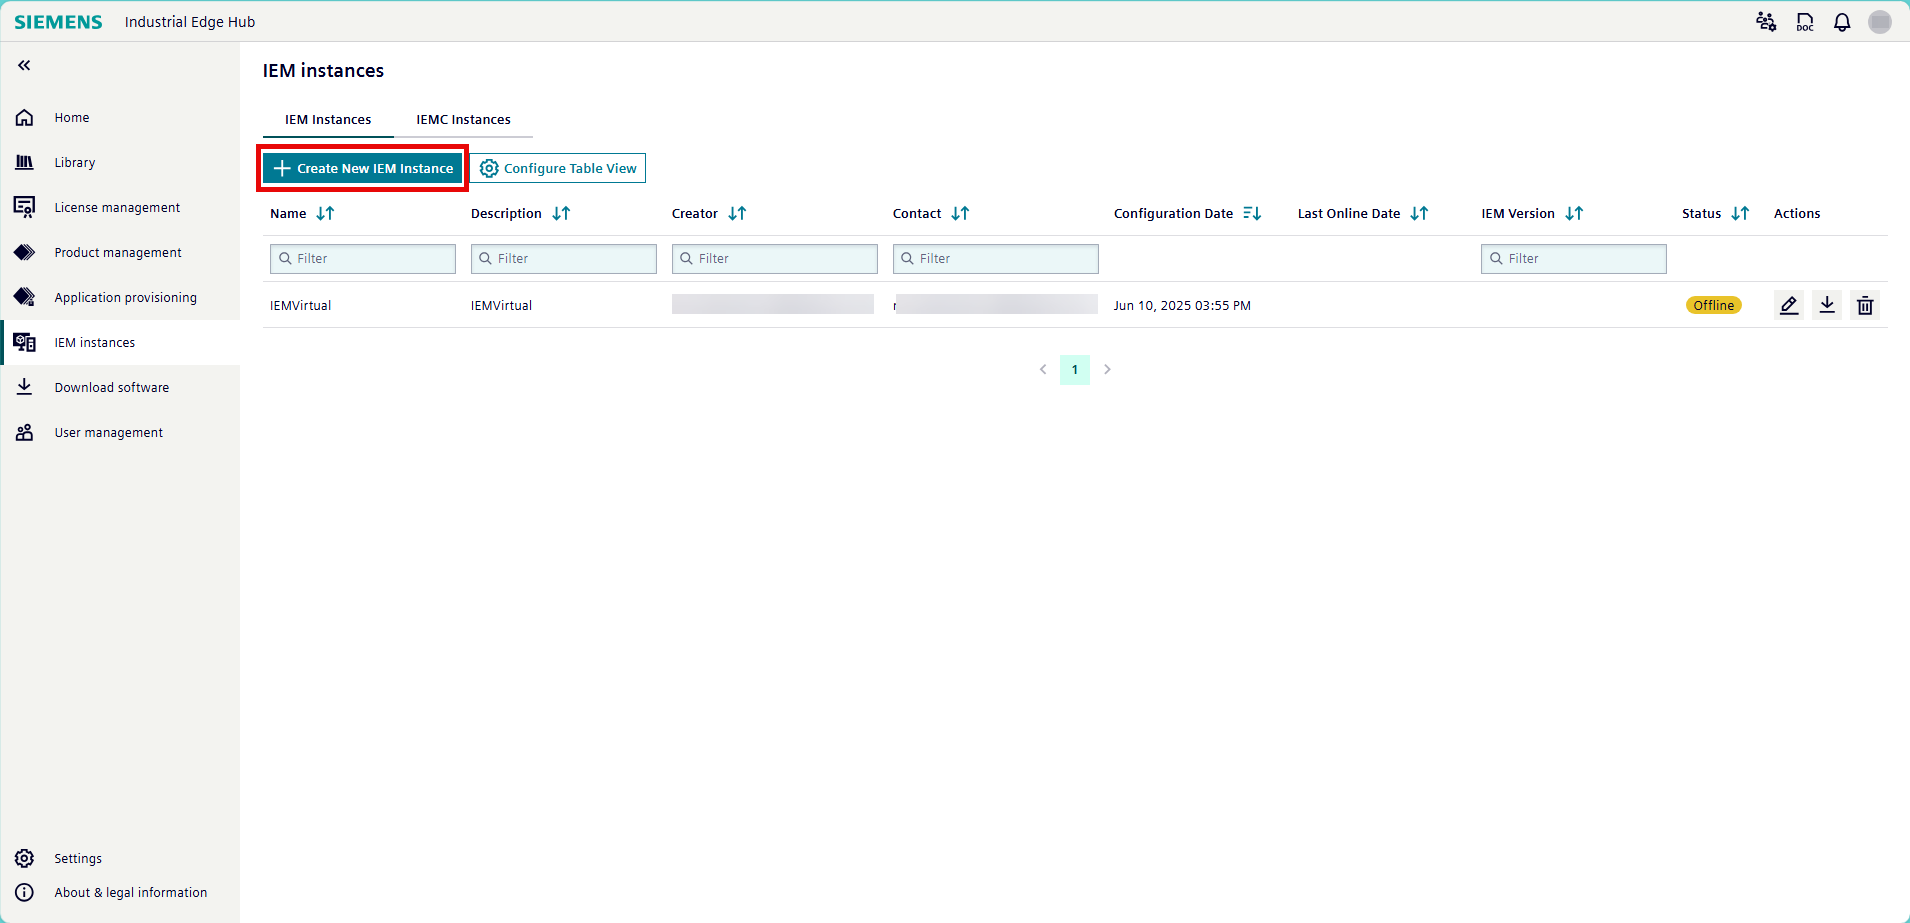
- Click "IEM instances" from the left navigation pane. The "IEM instances" page opens.
-
Click "Create New IEM Instance". The "Create IEM Instance" page opens.
NOTICE
Access to the "Create NEW IEM instance" button requires the IEM_MANAGER user role. If you have admin rights in the Hub, assign the role under Settings > User Management > Your Email > Edit. Otherwise, contact your administrator.
-
Give your IEM instance a name, a description, and an email address for the contact.
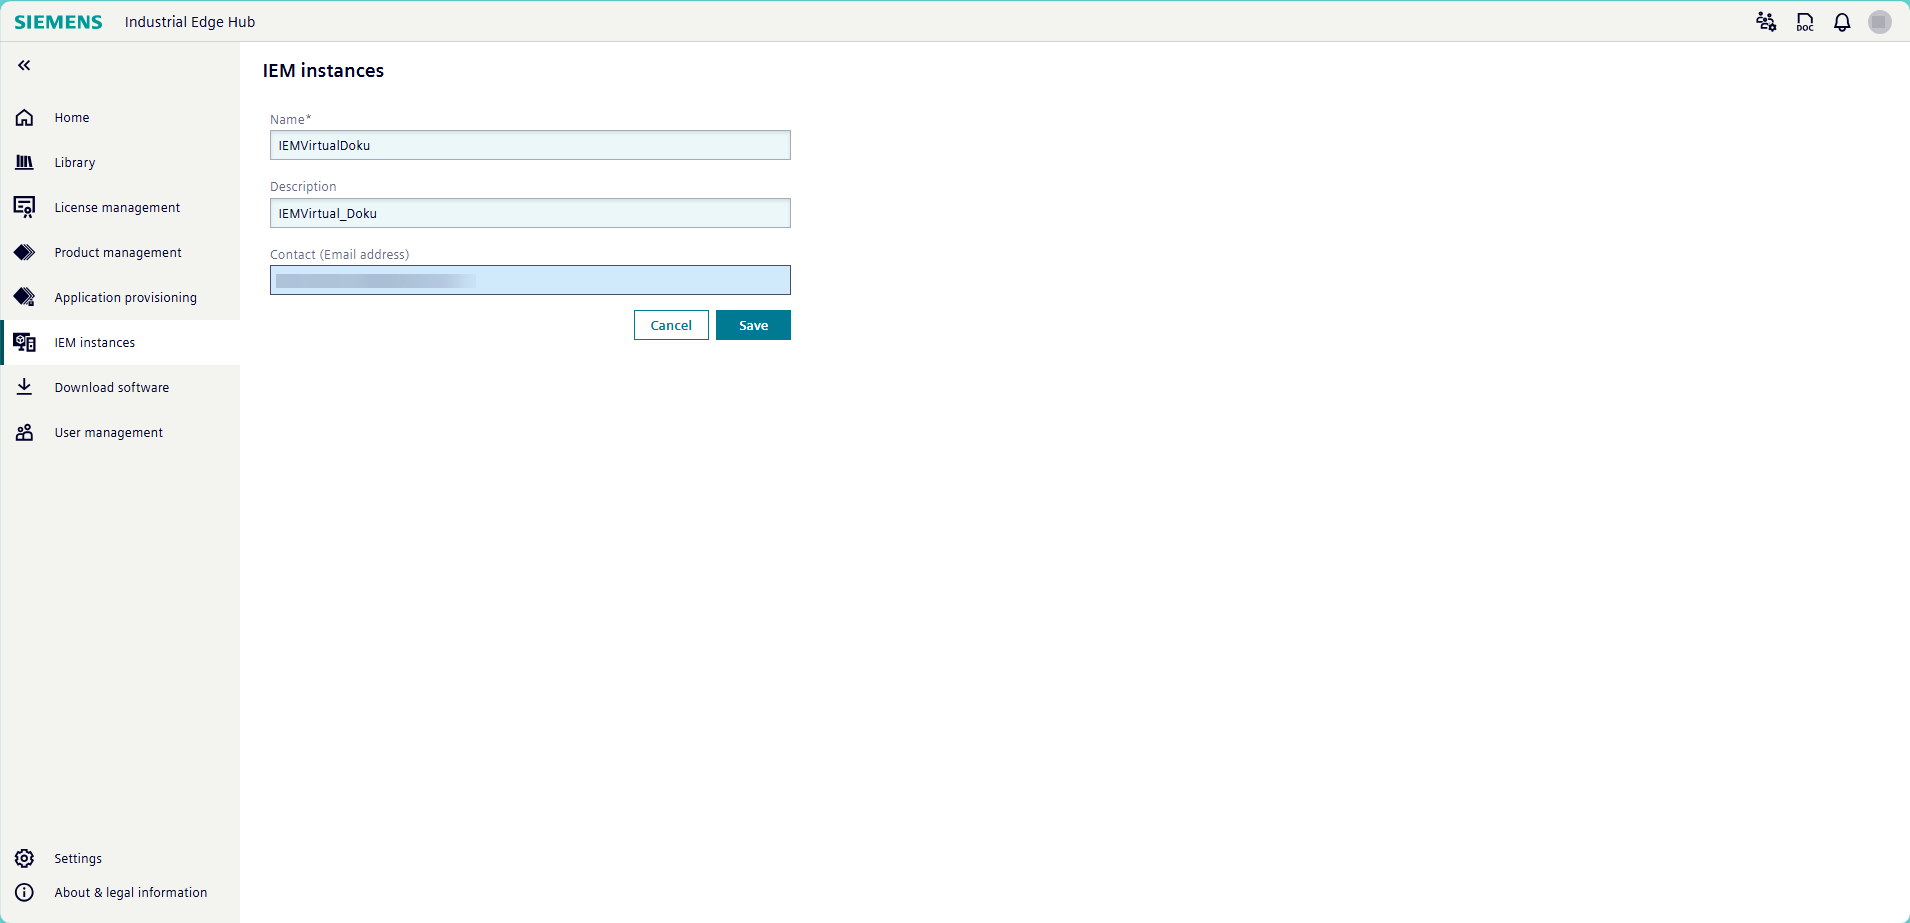
-
Click "Save". A status pop-up appears and displays the IEM instance creation process.
-
Navigate back to "IEM instances". IE Hub displays the new IEM instance when it finishes the installation process.
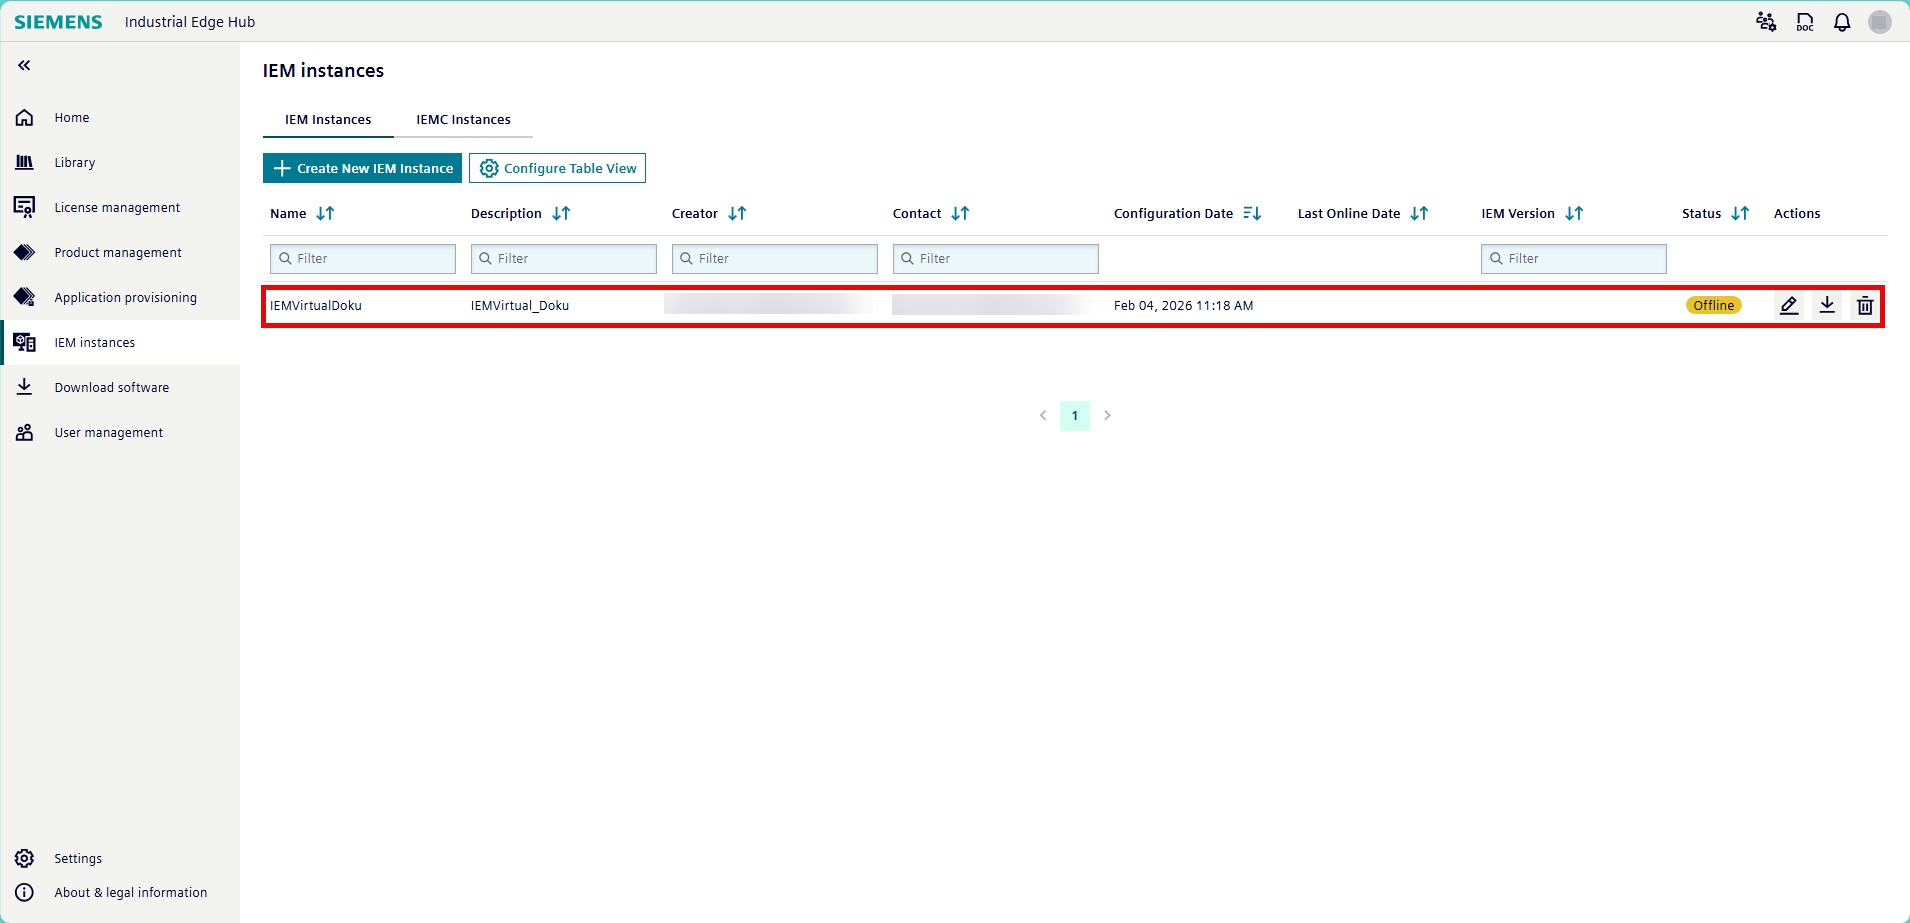
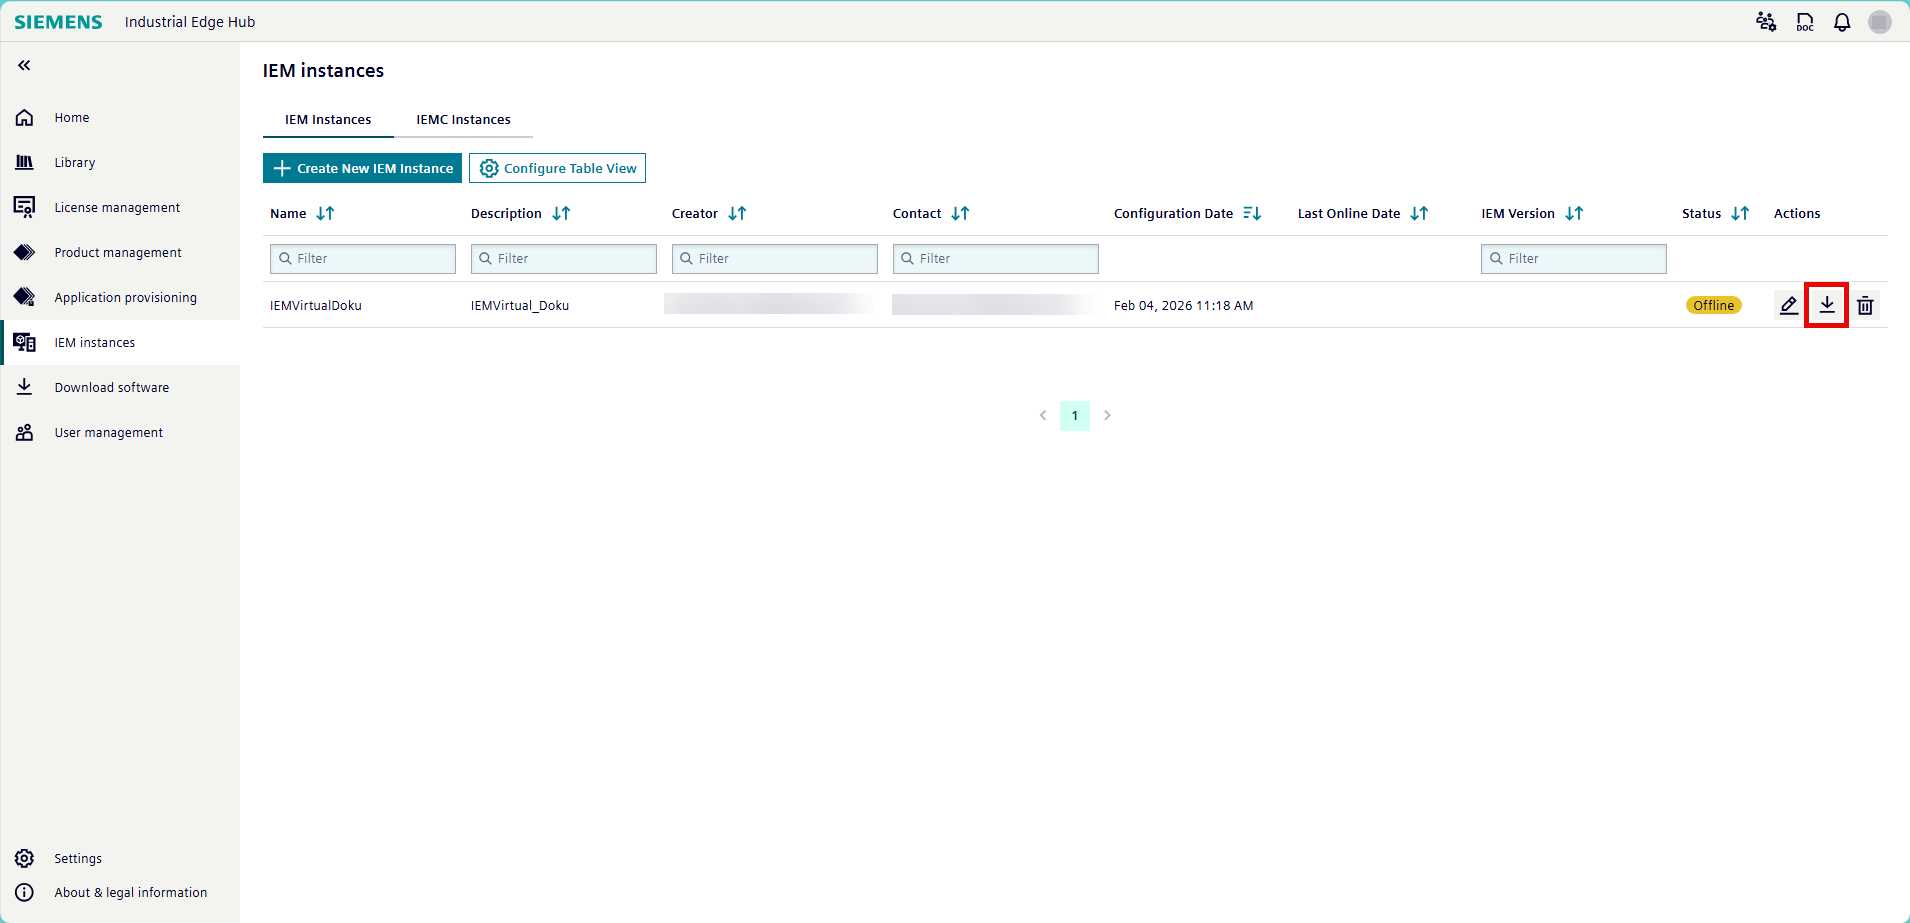
-
Click the "Download Configuration" icon in the "Actions" column for the IEM instance. The configuration file downloads according to your browser settings.
Valid for one hour
The configuration file is only valid for one hour. After one hour, the file expires and you must download a new configuration file.
Deploying IEM Virtual
After obtaining an IP address for IEM Virtual and downloading the configuration file for the IEM Virtual instance from IE Hub, deploy IEM Virtual.
- Open a web browser on the host PC or a client PC that is on the same network as IEM Virtual.
-
Enter the IP address of IEM Virtual with
http:/<IP address of IEM>. The browser displays the "Your connection isn't private" warning page because no certificates have been configured yet.
-
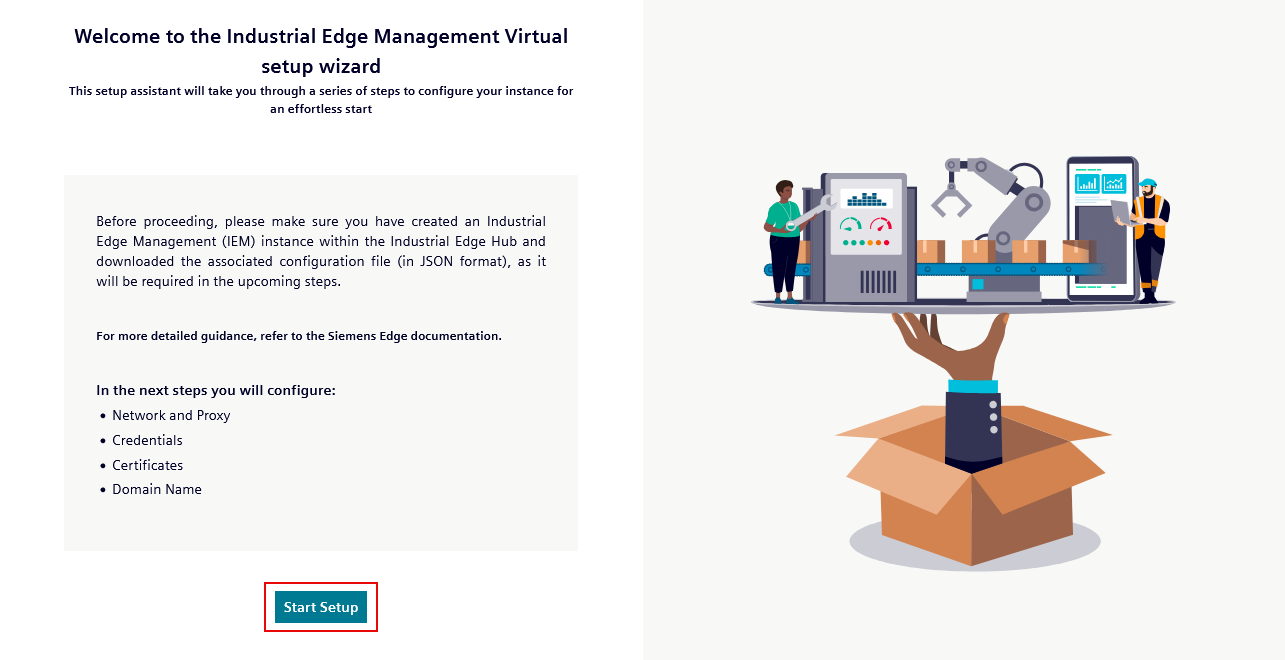
Click "Continue to XXX.XXX.XX.XXX (unsafe)". IEM Virtual automatically redirects to the Industrial Edge Virtual setup wizard.
-
Click "Start".
-
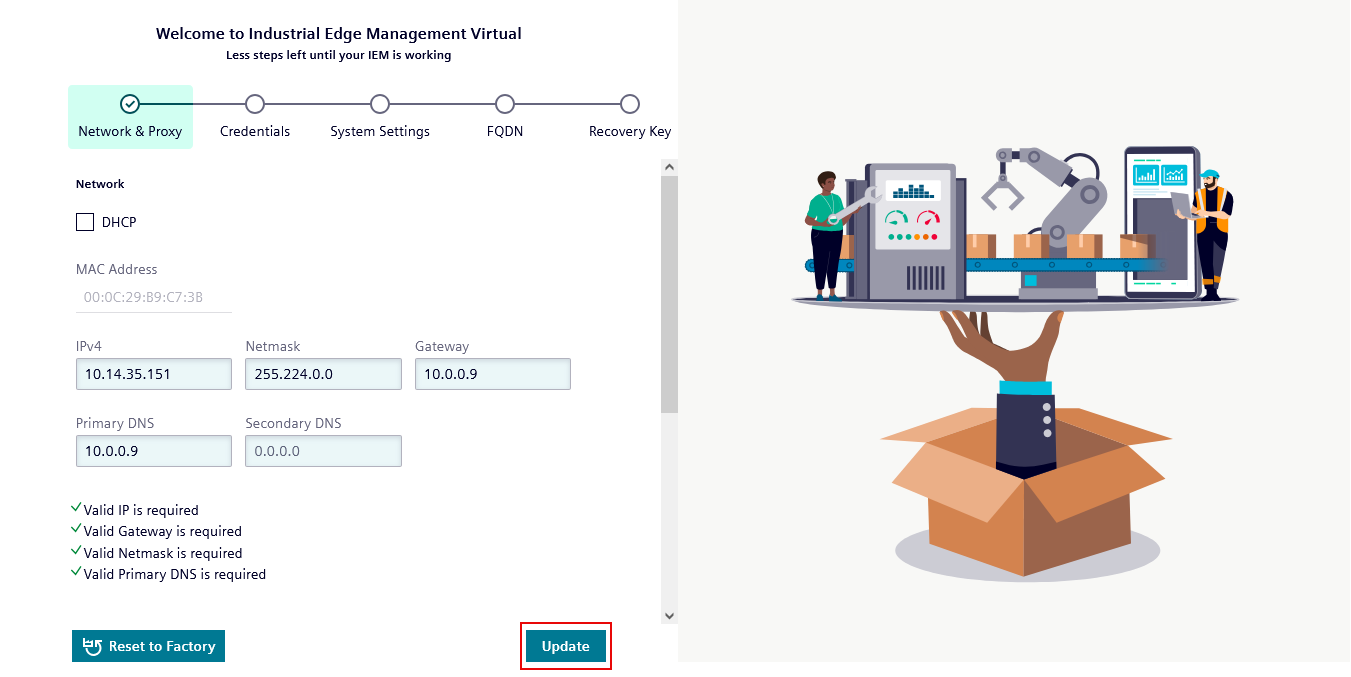
Click "I agree" to to confirm that the IP address will not change. The "Configure your network" page opens.

-
If you need to update the network configuration, adjust the settings and click "Update" to save the configuration. If not, click "Next".
NOTICE
The configuration file is only valid for one hour. After one hour, the file expires and you must download a new configuration file. Ensure "Gateway" and "DNS" are input correctly to allow IEM Virtual to access the Internet. IEM Virtual requires an Internet connection to connect to IE Hub for license matching.
NOTICE
Ensure the IP address remains constant for the lifetime of the IEM. If the IP address changes, the IEM may stop functioning. If you use DHCP, configure an IP reservation or a static lease so the assigned IP does not change.
-
Define the credentials for logging in to the IEM. Ensure the password adheres to the listed requirements.
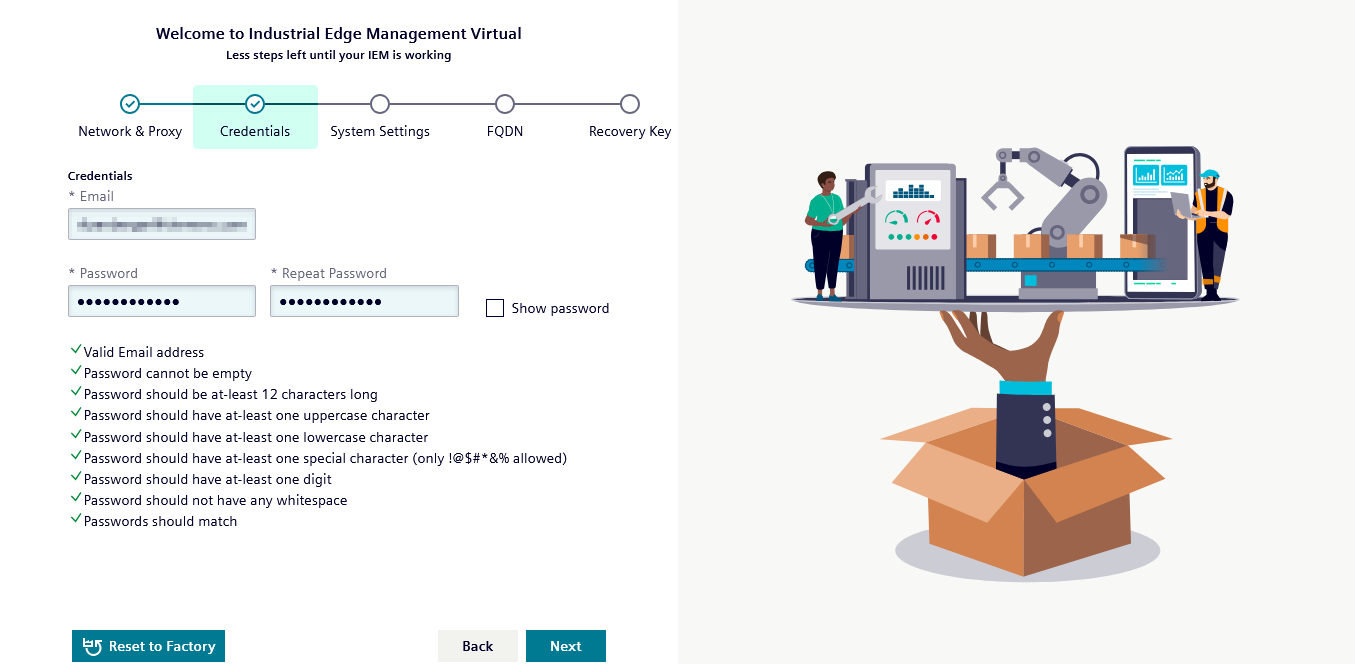
-
Note down the credentials or store them in your password manager and click "Next"
-
Select "self-signed certificate". Input mandatory and optional information. The setup wizard generates a self-signed certificate from this information. Under "Onboarding file", click "Upload file..." and select the generated configuration file.
Self-signed certificates
This tutorial shows the process for self-signed certificates. It is also possible to store your own certificate in IE Hub in advance. The certificate type cannot be changed afterwards.
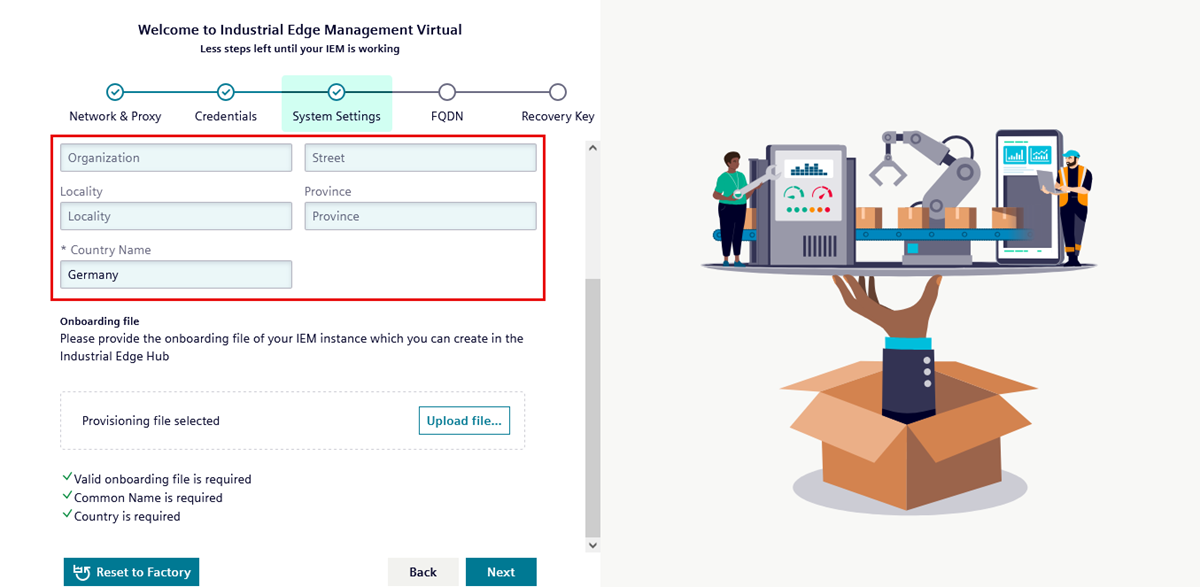
-
Click "Next". The "FQDN" page of the setup wizard opens.
-
For a test setup, leave the "Fully Qualified Domain Name (FQDN)" field blank. For a productive setup, enter an appropriate fully qualified domain name.
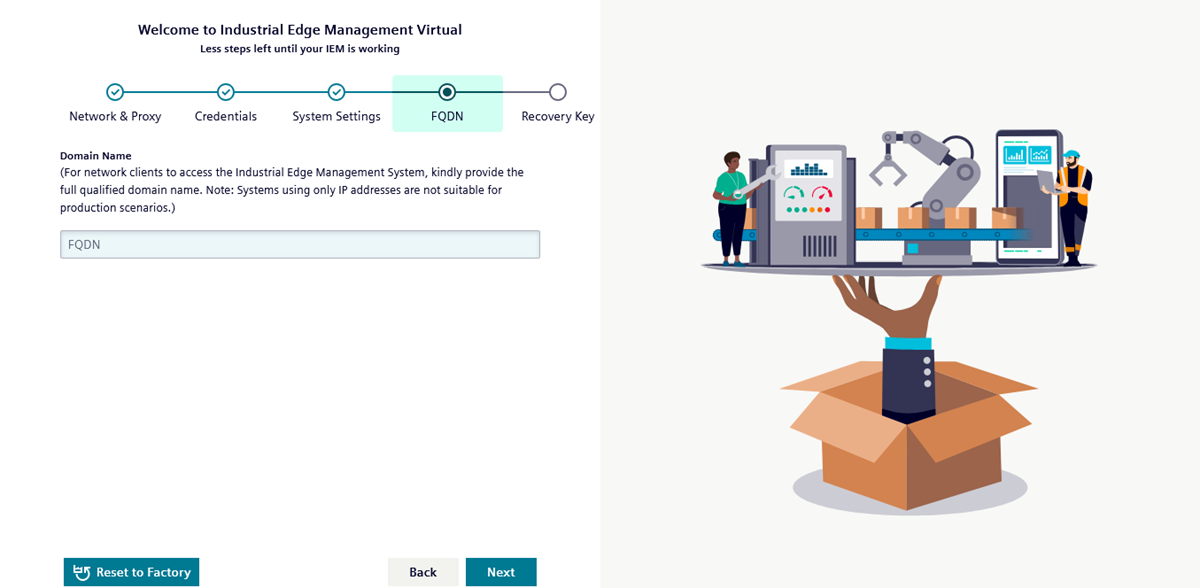
Cannot be changed
The "Fully Qualified Domain Name" cannot be changed at a later point in time.
-
Click "Next". The "Recovery Key" page of the setup wizard opens.
- Recovering or resetting IEM Virtual requires the recovery key. Note the recovery key down or store it in your password manager.
-
Click the checkbox to confirm that you have noted down the recovery key and saved it in a safe place.
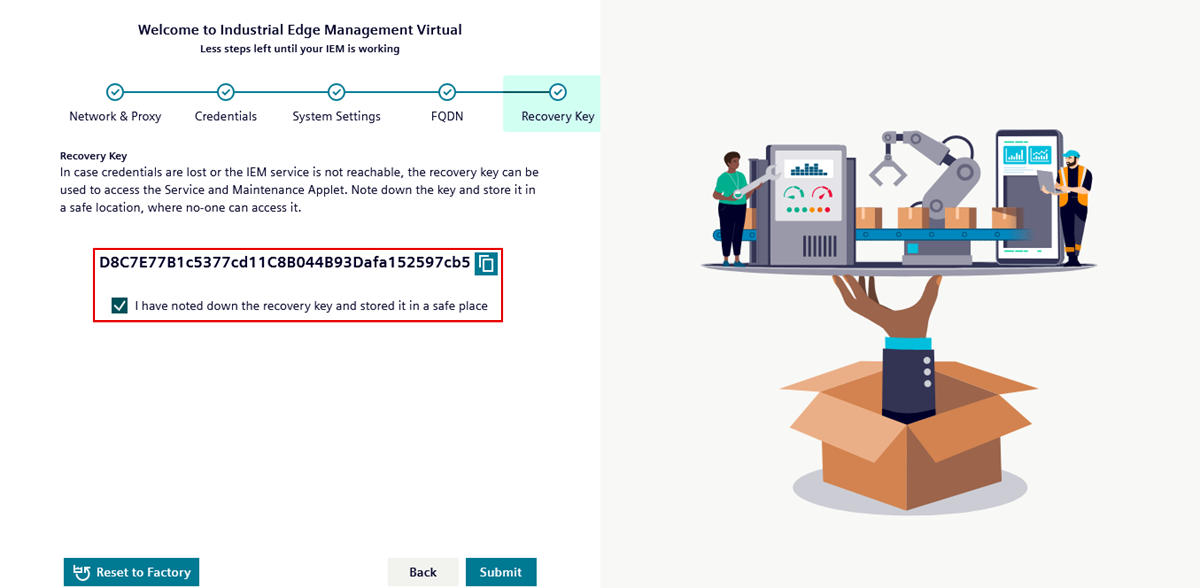
-
Click "Submit" to transfer your settings. The deployment process starts.
-
The setup wizard displays "System is ready to use. Click on Edge Management to proceed." when the deployment process is complete.
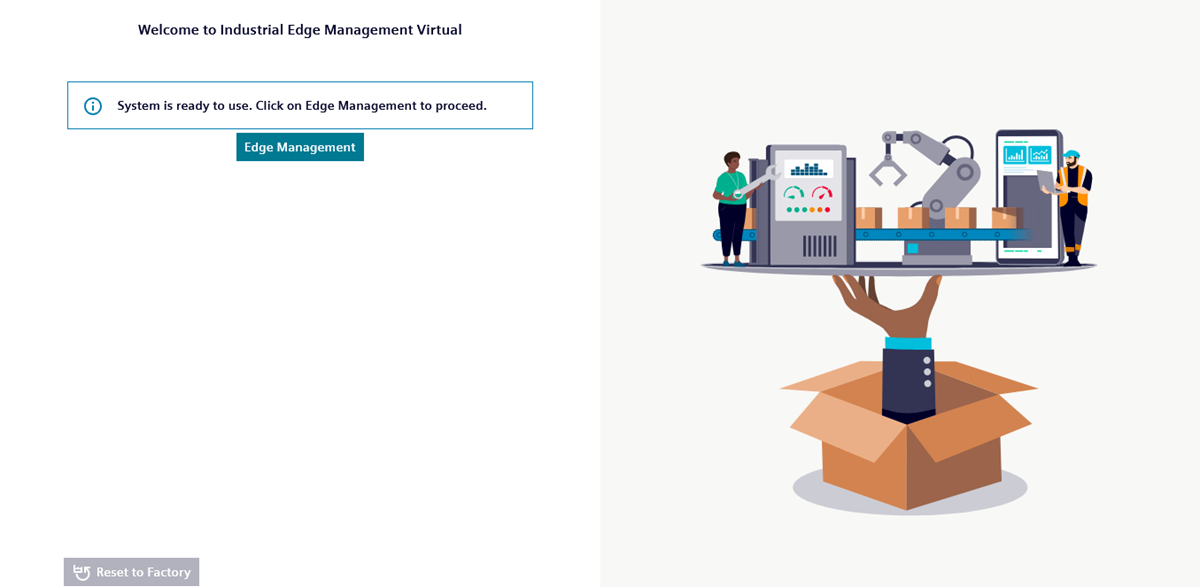
-
Click "Edge Management". The Industrial Edge Management login screen opens.
-
Enter the username and password assigned during setup.
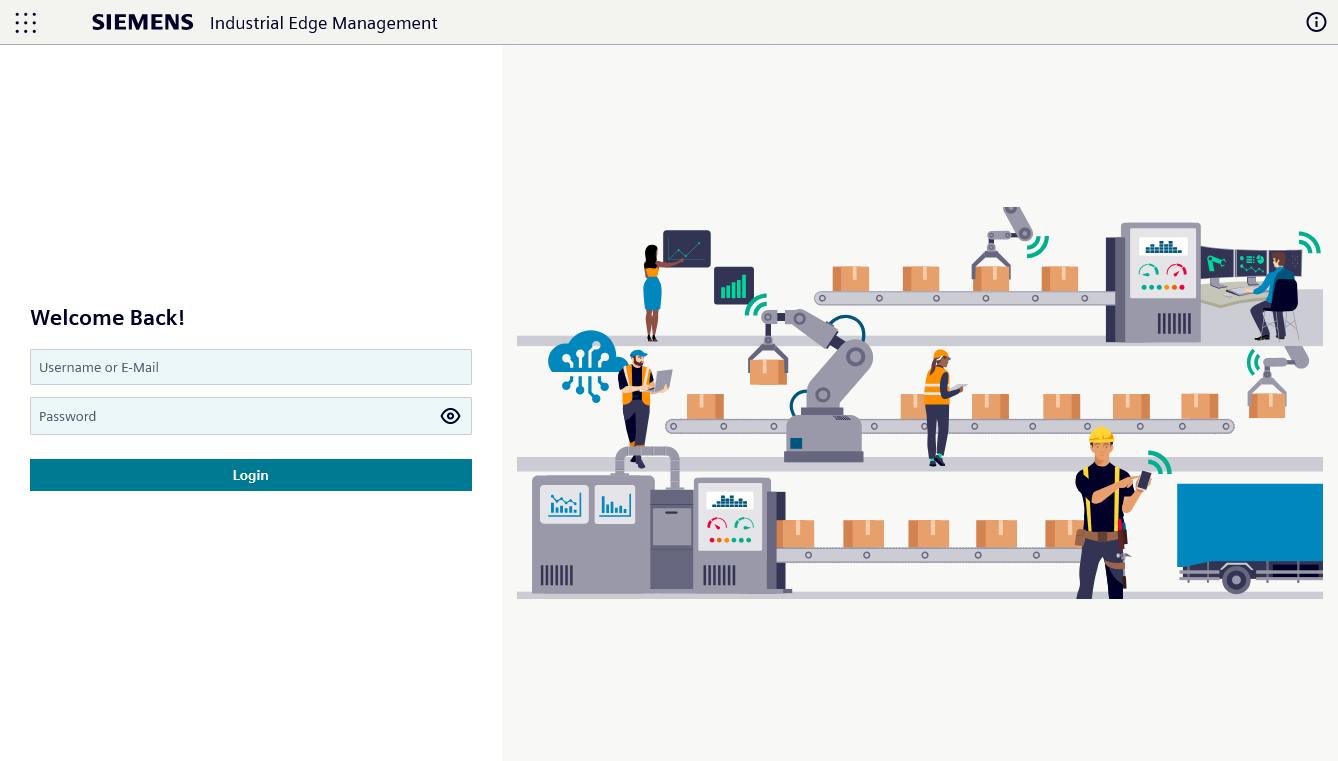
Validating the outcome for IEM Virtual
After entering your username and password, the IEM user interface opens. This means that you have successfully set up your IEM.
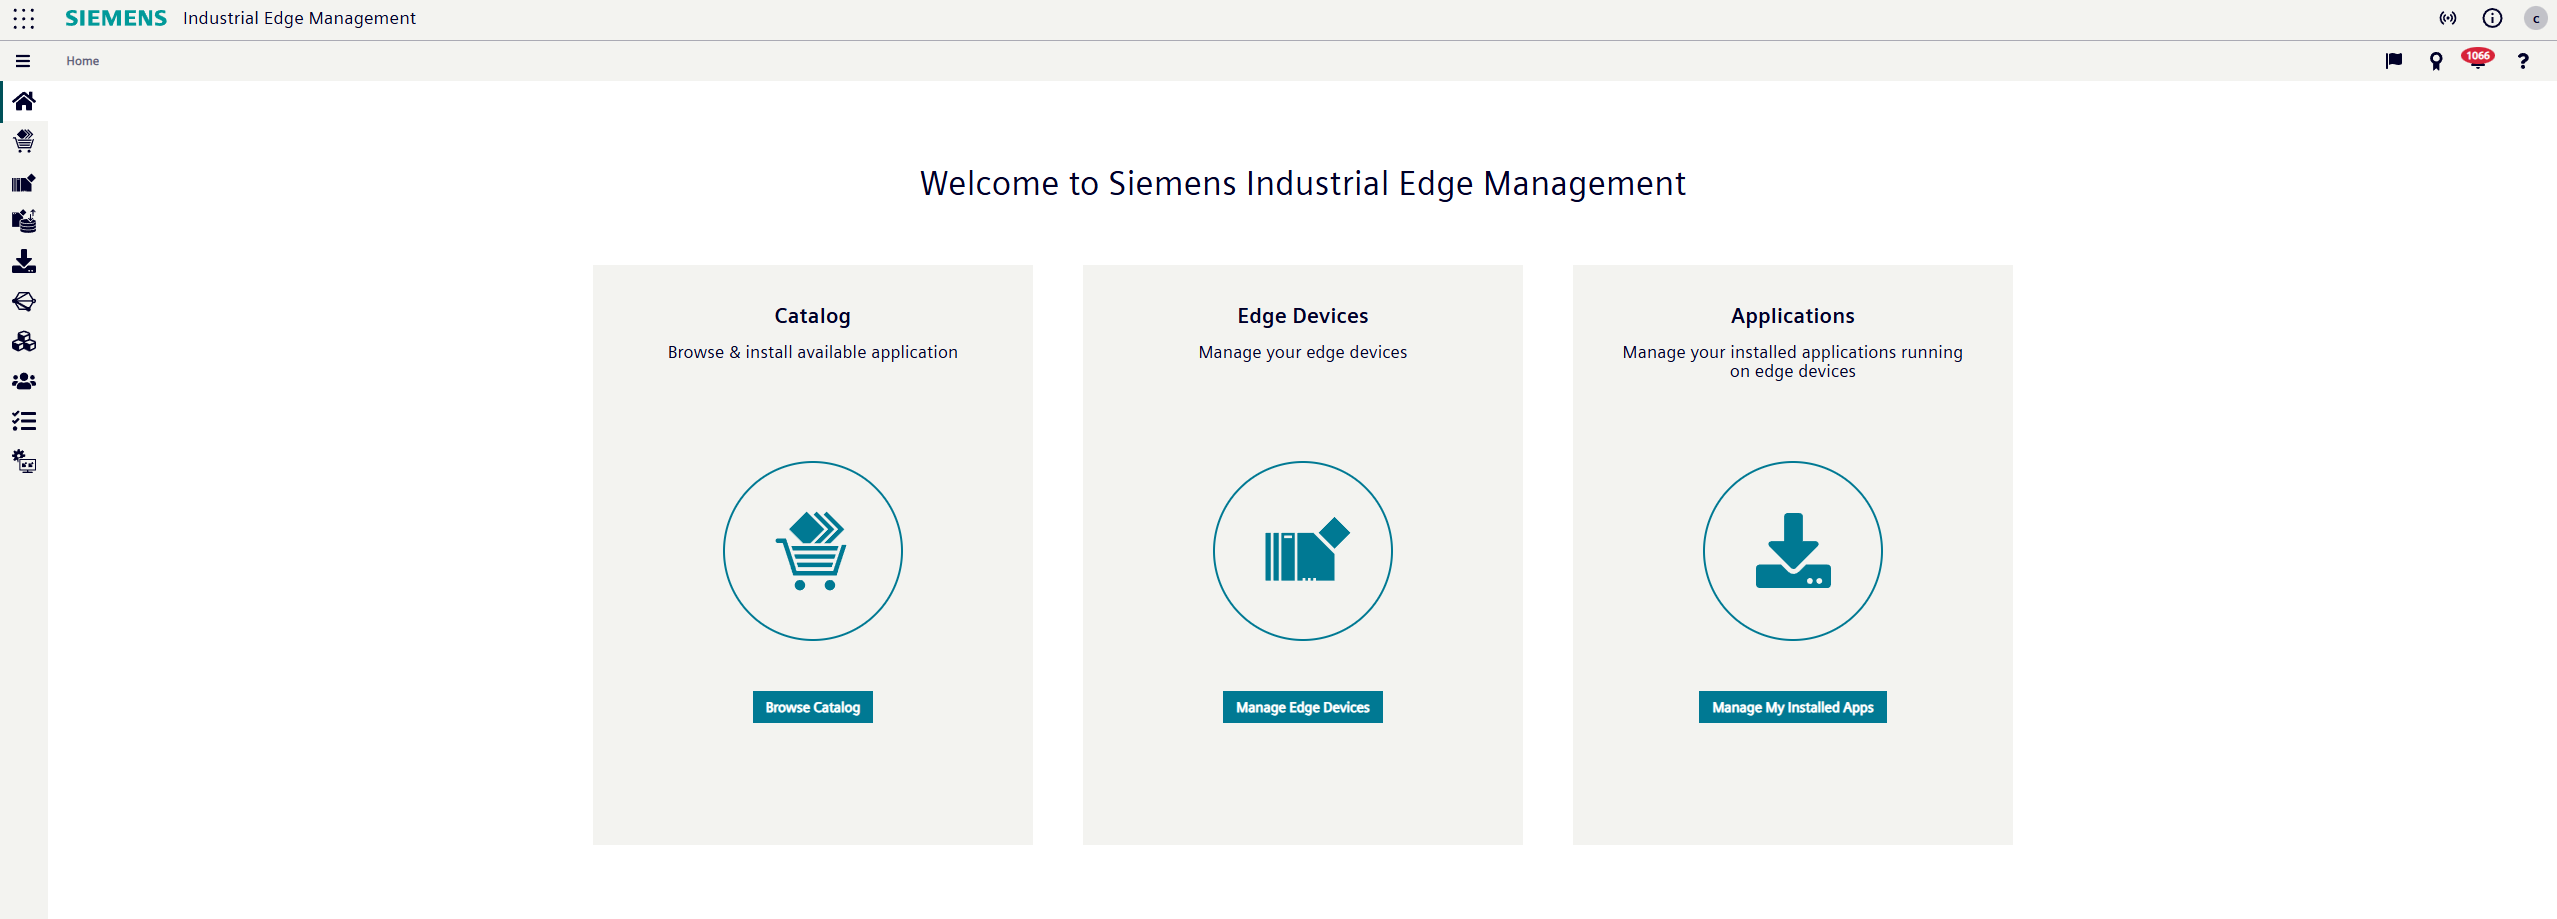
Proceed to What's next?.
What's next?
After setting up your IEM instance, proceed to Choosing your Industrial Edge Device.