Integration Guide
This guide will walk you through the process of enabling your device as an Industrial Edge Device with all functionalities. This is done by integrating the Industrial Edge Runtime into your firmware. Your device will be capable of running Edge Applications and enhanced Device Management via the Industrial Edge Management.
Prerequisites
- Access to the Industrial Edge Hub (with enabled Device Builder Features)
-
Physical or virtual hardware with root access (selection see below)
-
Install docker
- Install libevent
sudo apt install libevent-dev
NOTICE
Ensure your Edge Device is connected to the internet so that dependencies can be downloaded from public repositories during the installation process.
AppArmor Dependency
The Industrial Edge Runtime supports AppArmor as an optional dependency. While it is recommended for enhanced security, it is not mandatory for the runtime to function.
For installation instructions, refer to How to Install AppArmor.
NOTICE
The edge-iot-core-container_*.deb only supports nginx version < v1.26.
Procedures
Download IEDK Packages
The IEDK packages are available for arm64 and x86-64 processor architectures. They can be downloaded from the Download Software section in the Industrial Edge Hub. Make sure to download the right packages for your hardware.
China Region
For users in China region please download from Industrial Edge Hub China.
Exposing Industrial Edge Device
To set up the edge-iot-core container access during package installation, create a JSON file at /usr/lib/edge_iot_core/container_exposure.json.
This file is read during installation and copied to /etc/edge_iot_core_init/container_exposure.json for processing.
Modify /usr/lib/edge_iot_core/container_exposure.json for future updates.
Example JSON File
{
    "edge_iot_core": {
        "address": "0.0.0.0",
        "port": 443
    }
}
Adjust address and port as needed.
0.0.0.0 allows external device access.
Use 127.0.0.1 and 4443 for host-only access.
NOTICE
Use port 443 for edge-iot-core or install a gateway for other ports due to limited redirect support.
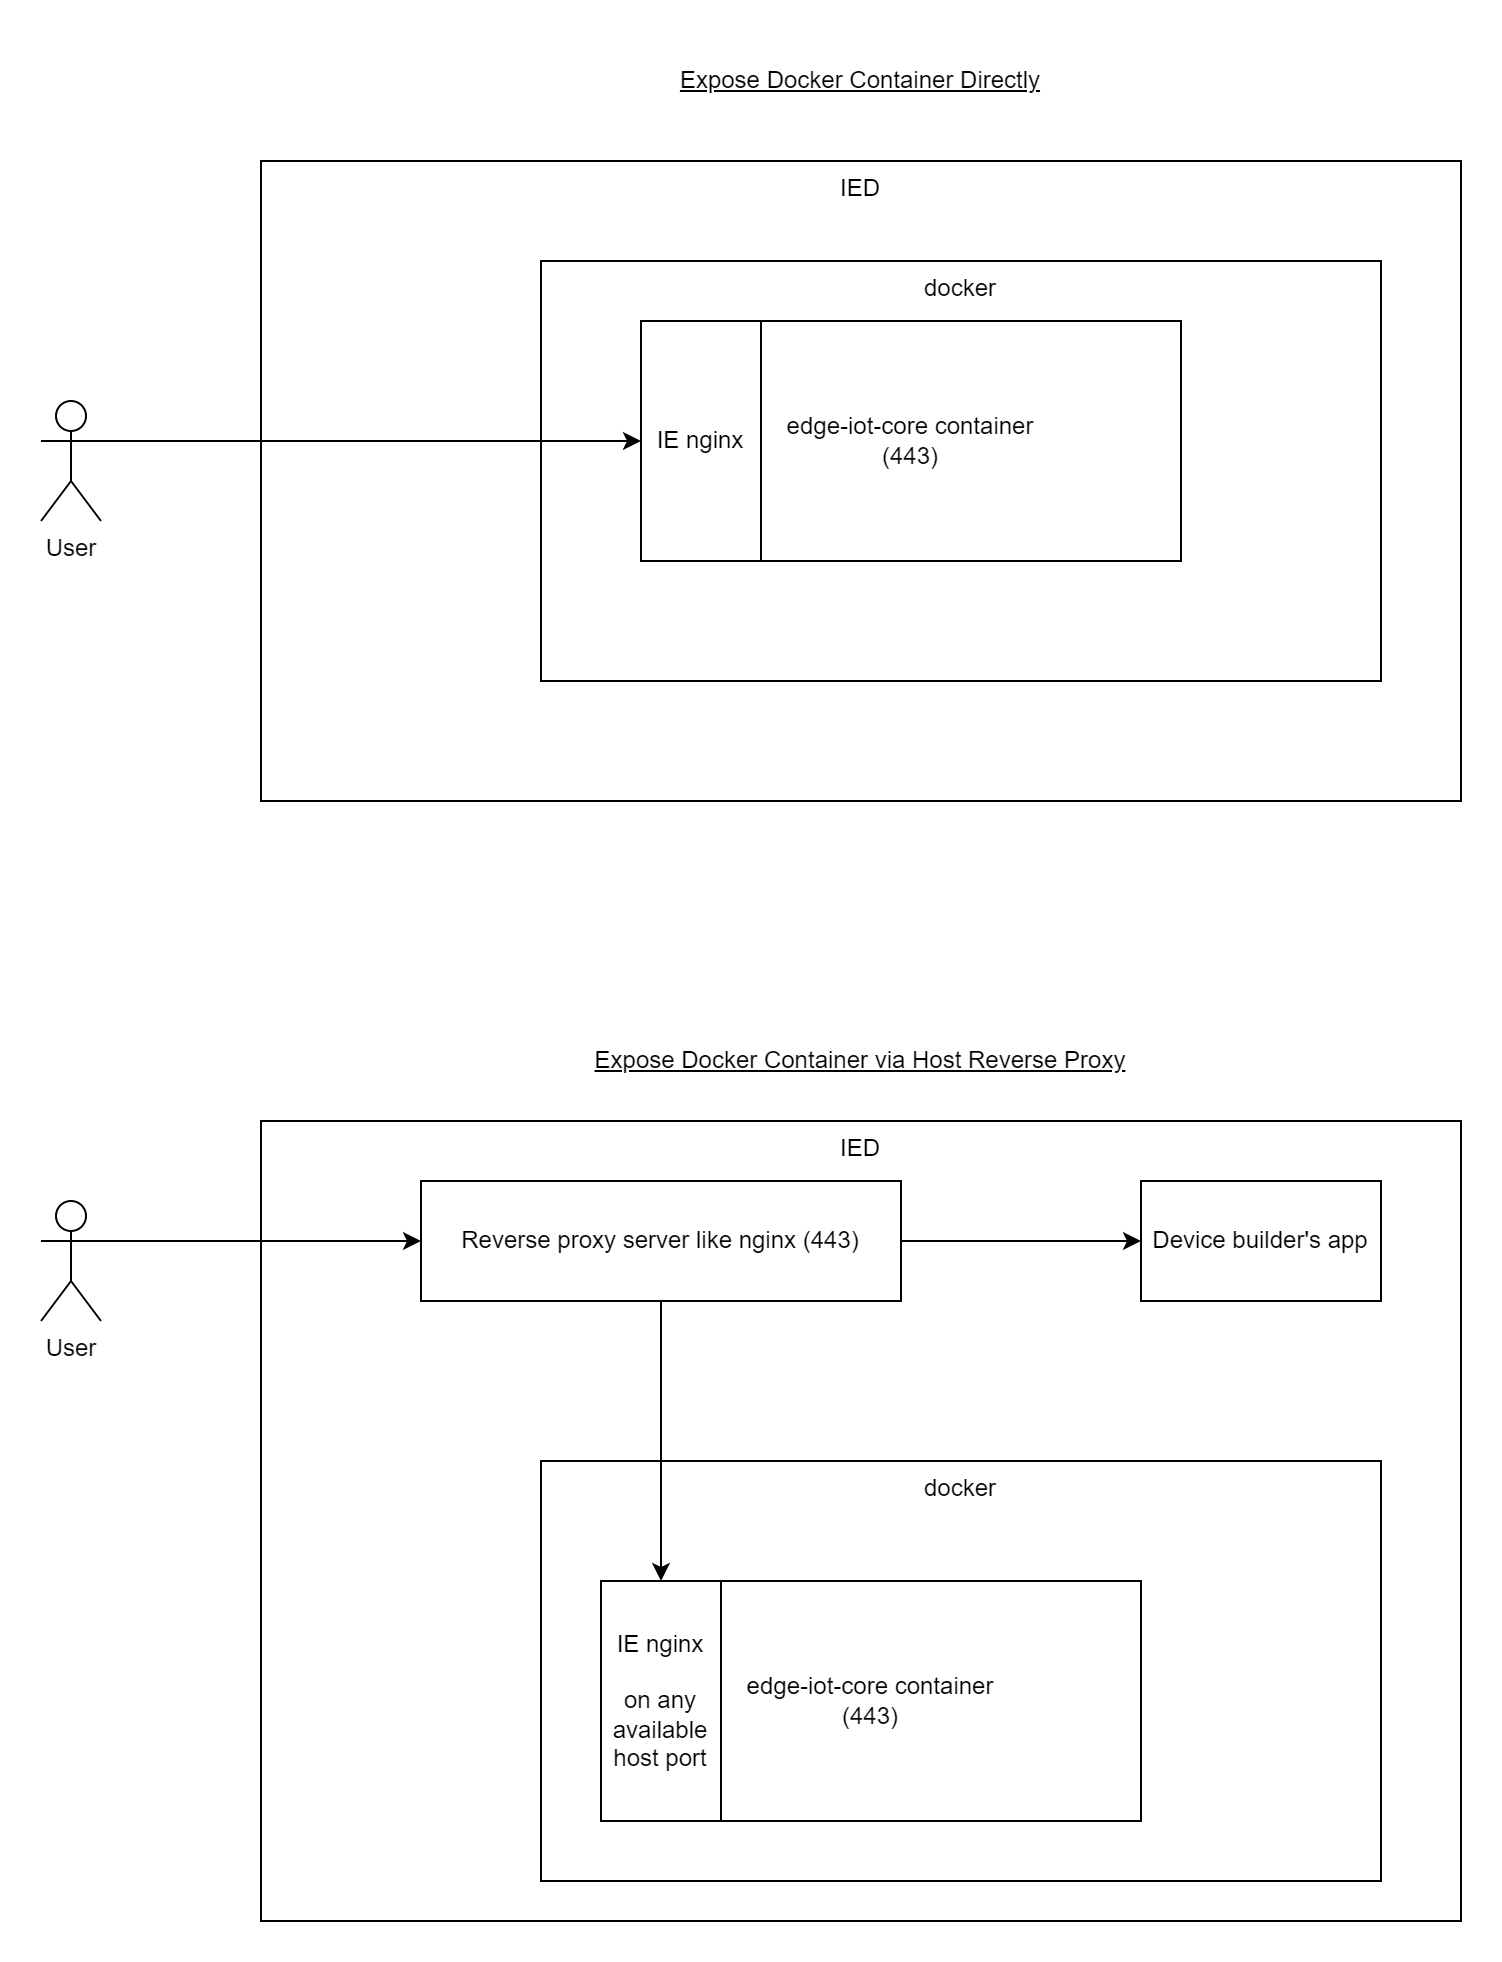
To enable the Industrial Edge Device, the following options are available:
- Direct Exposure: Default settings (
0.0.0.0and443) expose the container directly. - Reverse Proxy: Use
127.0.0.1and4443incontainer_exposure.json. Set up a reverse proxy like NGINX. For setup details, see NGINX Configuration.
Configuring Memory Limits for Edge Runtime Services
A memory limit ensures that Edge Runtime services run reliably without affecting the overall system performance.
The memory limit is determined in one of two ways:
Configuration File Present
If the following file exists and contains a valid numeric value:
/usr/lib/edge_iot_core/runtime_memlimit.json
with the structure:
{
  "edge_iot_core": {
    "runtime_memlimit": "<value_in_MiB>"
  }
}
then that value is used directly as the Edge Runtime memory limit.
✅ Example:
{
  "edge_iot_core": {
    "runtime_memlimit": 128
  }
}
-
This means each service running inside Edge Runtime will use 128 MiB as its memory limit.
-
If the file is invalid or contains non-numeric values, an error is logged and the memory limit for each Edge Runtime service is dynamically calculated based on the total device memory
No Configuration File Provided
If no file is provided, the system automatically calculates a suitable limit based on available system memory.
System memory is detected via /proc/meminfo.
✅ Example:
- On a system with 8 GB total memory, the runtime automatically assigns a memory limit of about 410 MiB per service.
NOTICE
- This memory limit is a soft limit, not a hard limit.
- Edge Runtime services are not killed when approaching the limit.
- Instead, the runtime forces memory to be freed up by making garbage collection more aggressive as the application approaches the set limit.
Summary
-
Provide a config file (
/usr/lib/edge_iot_core/runtime_memlimit.json) if you want to set a fixed memory limit in MiB. -
Do nothing if you prefer automatic allocation — the runtime will calculate an appropriate value.
Configuring HYDRA Service in Edge Runtime
Hydra is a component within the Edge Runtime that implements OAuth 2.0 and OIDC protocols.
It enables role-based access control (RBAC), giving application developers a secure and efficient way to manage authorization.
Enabling HYDRA consumes additional system resources due to cryptographic operations, which are computationally expensive.
Therefore, it is the responsibility of the device builder to determine whether enabling HYDRA is appropriate for a specific device, considering hardware capabilities and resource constraints.
HYDRA Service Configuration Overview
The HYDRA service inside the Edge Runtime can be enabled or disabled using a configuration file.
By default, HYDRA is disabled unless explicitly enabled through this file.
The HYDRA service state is determined in one of two ways:
Configuration File Present
If the following file exists and contains valid JSON:
/usr/lib/edge_iot_core/enabled_services.json
with the structure:
The file must contain the following JSON structure:
{
    "eic_service_states": {
        "HYDRA-SERVER": "enabled"
    }
}
-
This enables the HYDRA service.
-
If the file contains invalid JSON, is malformed, or cannot be parsed, an error is logged during the Edge runtime debian package installation and continues to set the default "disabled" value.
No Configuration File Provided
If the configuration file does not exist:
- HYDRA remains disabled by default.
NOTICE
- If the file is missing or malformed, HYDRA stays disabled.
- Only a valid, correctly formatted JSON file enables the HYDRA service.
- The service state is read during startup of the Edge Runtime.
- The HYDRA service configuration is available starting from hotfix IEDK 1.26.2-1 and IEDK 1.27.0-7,and all subsequent versions.
Summary
-
Provide a config file (
/usr/lib/edge_iot_core/enabled_services.json) to control the HYDRA service state. -
Provide valid JSON with "HYDRA": "enabled" to turn the service on.
-
If the file is absent or invalid, HYDRA remains disabled by default.
Update Considerations
As of version 1.22, the IEDK will no longer manage existing NGINX hosts. Depending on the installation type, you can manage NGINX or remove it.
Update Options:
- Continue NGINX Usage: Recommended for additional features like device-specific redirection. Maintain
127.0.0.1and4443incontainer_exposure.json. Maintenance is required. - Direct Runtime Exposure: Suitable when no gateway is needed, reducing maintenance. Remove NGINX and its configuration. Use default settings (
0.0.0.0and443).
NOTICE
SWUpdate uses an endpoint redirected through the host gateway.
If removed, update the URL to http://127.0.0.1:8081.
Port Conflict Handling
If you provide a port that is already in use, the installation will fail.
The preinst script checks if the specified port is available before proceeding with the installation.
If the port is already in use, you will see an error message indicating that the port is unavailable.
To avoid this problem, make sure that the port you specify is not being used by another service on your system. You can check the availability of a port by using the following command:
sudo ss -tuln | grep :<port_number>
Replace <port_number> with the port you want to check.
If the port is in use, choose a different port or stop the service using that port before proceeding with the installation.
NOTICE
Ports 9443 and 80 are restricted.
Configure Capabilities
You can optionally customize the capabilities to enable or disable device management functionalities. For detailed information, refer to Configure capability.
Install Industrial Edge Packages onto the Edge Device
Copy the downloaded IEDK packages to your development machine and unpack them. You can then run the following commands from inside the folder.
Advanced Installation
Execute following commands inside the IEDK folder for installing the components.
sudo cp capabilities.json /etc/

sudo apt install -f -y --assume-yes --allow-downgrades \
    ./redsocks*.deb \
    ./edge-manager_*.deb \
    ./edge-iot-core-container_*.deb \
    ./dm-network_*.deb   \
    ./dm-ntp_*.deb  \
    ./dm-onboard_*.deb \
    ./dm-system_*.deb \
    ./ie-sysproxy_*.deb
sudo cp capabilities.json /etc/

sudo apt install -y --assume-yes --allow-downgrades \
    ./edge-manager_* \
    ./edge-iot-core-container_* \
    ./dm-network_* \
    ./dm-ntp_* \
    ./dm-onboard_* \
    ./dm-system_* \
    ./redsocks_0.5-3_debian11_arm64.deb \
    ./ie-sysproxy_*
Check Installation
After the installation is completed, the installation status can be checked with the following command:
sudo docker ps
The output should show the edge-iot-core-container in an up state. You should see something similar to this screenshot:

NOTICE
Your device is now capable of all Industrial Edge functionalities like device management.
You can now continue with the onboarding.
Installation Scripts
If you want to use the scripts we provide just follow these instructions:
- Ensure that the Edge Device is switched on and connected to the internet because some extra dependencies, for example Docker, must be downloaded from public repositories during the installation process.
-
Download one of the provided installation scripts:
Example
#!/bin/bash

set -ex

if [ -z "$1" ]  && [ -z "$2" ]
then
    echo -e "\e[32m INSTALLATION STARTED.... \e[0m"
else
    proxy=$1
    port=$2
    printf 'Acquire::http::proxy "http://%s:%u";\n' "$proxy" "$port" | sudo tee -a /etc/apt/apt.conf.d/proxy.conf > /dev/null
    export http_proxy=http://$proxy:$port
    export https_proxy=http://$proxy:$port
fi


echo -e "\e[32mBIONIC distro adding to sources\e[0m"
sudo echo  "deb http://us.archive.ubuntu.com/ubuntu/ bionic  main universe" > /etc/apt/sources.list.d/bionic.list

echo -e "\e[32mINSTALLATION STARTED....\e[0m"

sudo apt update

echo -e "\e[32mDOCKER INSTALLATION....\e[0m"
sudo apt-get install -y \
    apt-transport-https \
    ca-certificates \
    curl \
    gnupg-agent \
    software-properties-common

curl -fsSL https://download.docker.com/linux/ubuntu/gpg | sudo apt-key add -
sudo add-apt-repository \
"deb [arch=amd64] https://download.docker.com/linux/ubuntu \
$(lsb_release -cs) \
stable" -y
sudo apt-get update
sudo apt-get install -y docker.io containerd

sudo apt install -y libevent-2.1-6

# Copy capabilities file to related directory
sudo cp capabilities.json /etc/

sudo apt install -f -y --assume-yes --allow-downgrades \
    ./redsocks*.deb \
    ./edge-manager_*.deb \
    ./edge-iot-core-container_*.deb \
    ./dm-network_*.deb \
    ./$(ls -v dm-ntp*.deb | tail -n 1) \
    ./dm-onboard_*.deb \
    ./dm-system_*.deb \
    ./ie-sysproxy_*.deb

# Cleanup Apt
sudo rm -rf /var/lib/apt/lists/*
echo -e "\e[32m INSTALLATION FINISHED\e[0m"
Example
#!/bin/bash set -ex if [ -z "$1" ] && [ -z "$2" ] then echo -e "\e[32m INSTALLATION STARTED.... \e[0m" else proxy=$1 port=$2 printf 'Acquire::http::proxy "http://%s:%u";\n' "$proxy" "$port" | sudo tee -a /etc/apt/apt.conf.d/proxy.conf > /dev/null export http_proxy=http://$proxy:$port export https_proxy=http://$proxy:$port fi echo -e "\e[32mINSTALLATION STARTED....\e[0m" sudo apt update echo -e "\e[32mDOCKER INSTALLATION....\e[0m" sudo apt-get install -y \ apt-transport-https \ ca-certificates \ curl \ gnupg-agent \ software-properties-common sudo mkdir -p /etc/apt/keyrings curl -fsSL https://download.docker.com/linux/ubuntu/gpg | sudo gpg --dearmor -o /etc/apt/keyrings/docker.gpg echo \ "deb [arch=$(dpkg --print-architecture) signed-by=/etc/apt/keyrings/docker.gpg] https://download.docker.com/linux/ubuntu \ $(lsb_release -cs) stable" | sudo tee /etc/apt/sources.list.d/docker.list > /dev/null sudo apt-get update sudo apt-get install -y docker.io containerd # Copy capabilities file to related directory sudo cp capabilities.json /etc/ sudo apt install -f -y --assume-yes --allow-downgrades \ ./redsocks_0.5-3_debian10_arm64.deb \ ./edge-manager_*.deb \ ./edge-iot-core-container_*.deb \ ./dm-network_*.deb \ ./$(ls -v dm-ntp*.deb | tail -n 1) \ ./dm-onboard_*.deb \ ./dm-system_*.deb \ ./ie-sysproxy_*.deb # Ubuntu server 20.04 Change from netplan to NetworkManager for all interfaces echo 'Changing netplan to NetowrkManager on all interfaces' # re-write the yaml file sudo sed -i "/version: 2$/a\ renderer: NetworkManager" /etc/netplan/50-cloud-init.yaml # setup netplan for NM netplan generate netplan apply # make sure NM is running # Cleanup Apt sudo rm -rf /var/lib/apt/lists/* echo -e "\e[32m INSTALLATION FINISHED\e[0m" -
Run the downloaded script with the following command as root user:
bash install_script_4_*.sh
Resource Management
Industrial Edge's Resource Manager has been tested on Debian 11 Bullseye and Debian 12 Bookworm. For Debian 11, make sure to include bullseye-backports in sources.list as explained below. If you want to use the scripts provided by us, follow these instructions:
-
Ensure that the Edge Device is switched on and connected to the Internet because some extra dependencies, for example Docker, must be downloaded from public repositories during the installation process.
-
Download one of the provided installation scripts:
-
x86-64 based device (debian-11-bullseye): Installation script for Debian 11 Bullseye x86-64
-
arm64 based device (debian-11-bullseye): Installation script for Debian 11 Bullseye arm64
NOTICE
These scripts need to be executed with
sudo. You can run them as shown in the example below. If your user is not included in the sudoers file, add it. Alternatively, you can become root using thesu -command and directly run the scripts.sudo bash install_script_4_debian11-bullseye.sh # x86-64 based devices sudo bash install_script_4_debian11-bullseye_arm.sh # arm64 based devicessu - bash install_script_4_debian11-bullseye.sh # x86-64 based devices bash install_script_4_debian11-bullseye_arm.sh # arm64 based devices -
If the CPU plugin is to be installed on the system, the following steps should be taken after running the installation script. These steps will ensure that the base system is real-time capable, a prerequisite for CPU isolation. For more detailed information, see the Resource Manager page.
# Add bullseye-backports repo
sudo tee /etc/apt/sources.list.d/bullseye-backports.list << EOF
deb http://deb.debian.org/debian bullseye-backports main
deb-src http://deb.debian.org/debian bullseye-backports main
EOF
# Update the apt package index sudo apt update# Install linux-image-rt-amd64 and linux-perf from bullseye-backports repo sudo apt install -y -t bullseye-backports linux-image-rt-amd64 linux-perfNOTICE
If you are using arm64-based Debian 11 Bullseye, you should use the following command instead of the one above.
# Install linux-image-rt-arm64 and linux-perf from bullseye-backports repo
sudo apt install -y -t bullseye-backports linux-image-rt-arm64 linux-perf
# Install gawk, python3-linux-procfs, python3-pyudev, virt-what and tuned from bullseye-backports repo sudo apt install -y -t bullseye-backports gawk python3-linux-procfs python3-pyudev virt-what tunedFinally, install the actual plugin for the Resource Manager:
cd resource-management/packages
sudo apt install -y ./ie-cpu-resource-plugin_*.deb
NOTICE
As the kernel is updated with the version from the bullseye-backports repository, it is important to restart the system:
sudo rebootAfter installation and reboot, the `iedge`` tuning profile needs to be activated:
sudo tuned-adm profile iedge -
If the network interface plugin is to be installed on the system, the following steps should be taken after running the installation script.
cd resource-management/packages sudo apt install -y ./ie-docker-network-plugin_*.deb ./ie-network-resource-plugin_*.deb -
If you want to install the GPU plugin on your system, the following steps should be taken after running the installation script.
NOTICE
For more information, refer to the documentation of the Resource Manager's documentation for device builders.
cd resource-management/packages sudo apt install -y ./ie-nvidia-gpu-resource-plugin_*.deb -
If the shared memory plugin is to be installed on the system, the following steps should be taken after running the installation script.
NOTICE
For more information, refer to the documentation of the Resource Manager's documentation for device builders.
cd resource-management/packages sudo apt install -y ./ie-shared-memory-resource-plugin_*.deb -
If the GPIO plugin is to be installed on the system, the following steps should be taken after running the installation script.
NOTICE
For more information, refer to the documentation of the Resource Manager's documentation for device builders
cd resource-management/packages
sudo apt install -y ./ie-gpio-resource-plugin_*.deb
IEDK Service Configurations Hints
This section provides some hints for configuring IEDK services.
System Service: SMBIOS Data and dmidecode Limitations
NOTICE
Understanding CPU frequency reporting in virtual environments
Virtualization platforms (such as VirtualBox, VOX) often provide incomplete SMBIOS (System Management BIOS) data to guest systems. The dmidecode utility relies on this SMBIOS table to retrieve hardware information, including CPU specifications.
The Issue:
When the Max Speed field is missing or empty in the SMBIOS table, the System Service (GetResourceStats RPC method) cannot retrieve valid CPU frequency data and will return -1 for the CPU frequency field.
Why This Happens:
Hypervisors abstract hardware to maximize compatibility and minimize overhead, resulting in simplified or generic SMBIOS structures that lack detailed CPU information. This affects tools like dmidecode that depend on complete SMBIOS datasets.
Diagnostic Commands:
Check SMBIOS data availability:
sudo dmidecode -t processor | egrep 'Max Speed|Current Speed' -A1
Query runtime CPU frequency (recommended for VMs):
lscpu | egrep 'CPU MHz|Model name'
Recommendation: Test on physical hardware or VM platforms with full SMBIOS support (e.g., VMware) if accurate CPU frequency reporting is required.
Host additional resources (nginx)
NOTICE
This section applies to versions of the IEDK below version 1.23, where NGINX was managed by the IEDK itself. If you are exposing the IEDK through a reverse proxy, you can do so by following the documentation for the reverse proxy of your choice. For NGINX, refer to hostgw.md, which is referenced in the "Ways to Enable Industrial Edge Device" section under "Reverse Proxy".
You can host your own services on the host nginx. To expose or host your own APIs via Nginx installed during the IEDK package installation, follow these steps:
-
Create a New Location File:
- Create a new location file for your service, for example IE Devices have ,
/etc/nginx/conf.d/edge.conf.locations.
- Create a new location file for your service, for example IE Devices have ,
-
Reference the Location File:
- Reference this new location file in the main Nginx configuration file
/etc/nginx/conf.d/edge.conf.
- Reference this new location file in the main Nginx configuration file
Here is an example of how you can configure this:
Step-by-Step Guide
-
Create a New Location File:
- Open a terminal and create a new location file:
sudo nano /etc/nginx/conf.d/myapp.conf.locations- Add your location block to this file. For example:
location /myapi/ { proxy_pass http://localhost:8080/; proxy_set_header Host $host; proxy_set_header X-Real-IP $remote_addr; proxy_set_header X-Forwarded-For $proxy_add_x_forwarded_for; proxy_set_header X-Forwarded-Proto $scheme; } -
Reference the Location File in
edge.conf:- Open the main Nginx configuration file:
sudo nano /etc/nginx/conf.d/edge.conf- Ensure that the following line is included to reference your new location file:
include /etc/nginx/conf.d/myapp.conf.locations; -
Reload Nginx Configuration:
- After making these changes, reload the Nginx configuration to apply them:
sudo systemctl reload nginx
By following these steps, you can host your own services on Nginx installed during the IEDK package installation. This allows you to expose your APIs via the Nginx server.
NTP
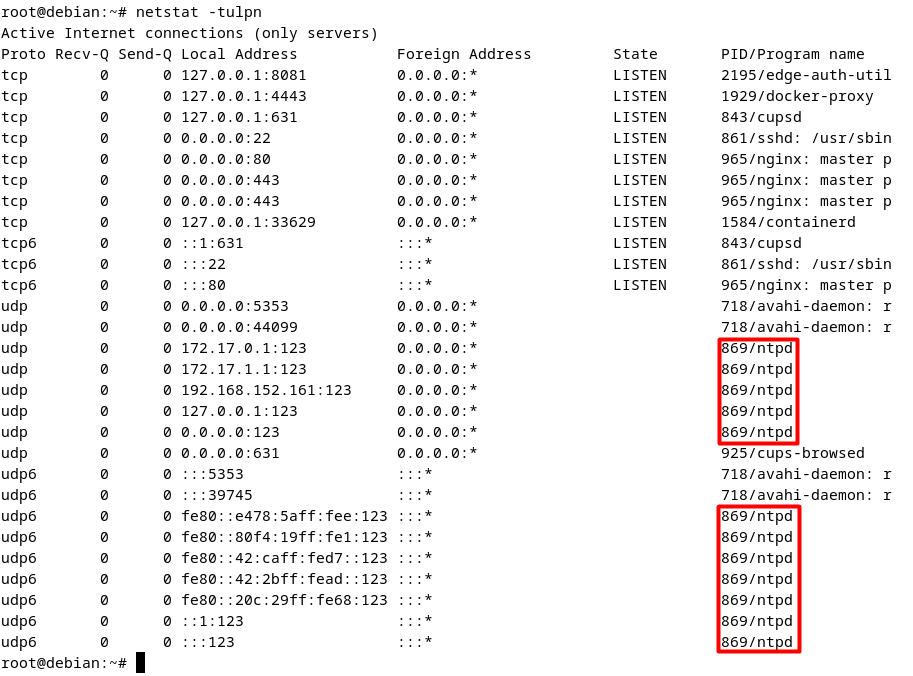
NOTICE
On some devices, UDP port 123 may not be open as an outgoing port. If this port is not open as an outgoing port, the ntpd service will not work properly, and the system time cannot be set accurately. Ensure that UDP port 123 is open as an outgoing port so that NTPD services to can use it successfully. You can check the status of this port with the following command:
netstat -tulpn
NetworkManager
This section contains NetworkManager related configurations. It can be skipped if the network settings are managed directly with NetworkManager.
If network settings are configured by different tool than Network Manager, NetworkManager must be enabled from within this tool in order to onboard device successfully to IEM.
Without Network Manager adjustment, there might be a problem with the device's network settings, such that the device is not onboarded due to a network-related issue, or the IP address is not showing up in the IE Device UI.
Examples
NetworkManager must be enabled if other tools are used except the ones below.
netplan
The netplan utility is installed by default for configuring network interfaces for Ubuntu Server installations.
Netplan has the ability to run both systemd-networkd or NetworkManager. However, to allow the NetworkManager to manage all network devices with the help of netplan, the distinction must be stated before using it.
For that, the following setting should be applied, where renderer must be specified explicitly:
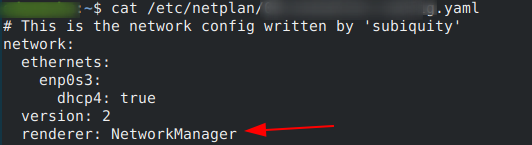
sudo netplan apply
ifupdown
/etc/NetworkManager/NetworkManager.conf
..
[ifupdown]
managed=false -> true

nmcli device set ens33 managed yes